<?xml version="1.0" encoding="utf-8"?><feed xmlns="http://www.w3.org/2005/Atom" ><generator uri="https://jekyllrb.com/" version="3.10.0">Jekyll</generator><link href="https://muru.dev/feed.xml" rel="self" type="application/atom+xml" /><link href="https://muru.dev/" rel="alternate" type="text/html" /><updated>2026-04-13T23:05:03+00:00</updated><id>https://muru.dev/feed.xml</id><title type="html">Murukesh Mohanan</title><entry><title type="html">Naming a netns with systemd Private Mounts</title><link href="https://muru.dev/2024/03/25/netns-systemd-ii.html" rel="alternate" type="text/html" title="Naming a netns with systemd Private Mounts" /><published>2024-03-25T00:00:00+00:00</published><updated>2024-03-25T00:00:00+00:00</updated><id>https://muru.dev/2024/03/25/netns-systemd-ii</id><content type="html" xml:base="https://muru.dev/2024/03/25/netns-systemd-ii.html"><![CDATA[<p>In <a href="/2023/08/26/netns-systemd.html" title="Private Mounts in systemd and netns">my previous update</a>, I used a symbolic link to set up the name for new namespace, like so:</p>

<div class="language-plaintext highlighter-rouge"><div class="highlight"><pre class="highlight"><code>ln -sf /proc/self/ns/net /var/run/netns/vpn
</code></pre></div></div>

<p>Months later, this resulted in a face-meet-palm moment as I realized that since <code class="language-plaintext highlighter-rouge">/proc/self</code> changes for every process,
this link was meaningless. It didn’t prevent the rest of the setup from working fine, of course, as none of that uses
the <code class="language-plaintext highlighter-rouge">vpn</code> name to refer to the netns. However, if I wanted to run a command inside, then I had a problem. I embarked
upon yet another journey to see how I could name if <code class="language-plaintext highlighter-rouge">/proc/self</code> wasn’t option. A couple of ways came to mind:</p>

<div class="language-plaintext highlighter-rouge"><div class="highlight"><pre class="highlight"><code>/bin/sh -c 'ln -sf /proc/$$/ns/net /var/run/netns/vpn'
/bin/sh -c 'ip netns attach vpn $$'
</code></pre></div></div>

<p>The first option didn’t work. Since the process in question died immediately, the link would become invalid. The second
option, in which <code class="language-plaintext highlighter-rouge">ip netns attach</code> does <a href="https://7bits.nl/journal/posts/what-does-ip-netns-add-actually-do/" title="What does ip netns add actually do? - Peter van Dijk"><code class="language-plaintext highlighter-rouge">mount</code> shenanigans</a>, seemed like it should work. Apparently, it remounts
<code class="language-plaintext highlighter-rouge">/var/run/netns</code> as a bind-mount to itself, making it shared in the process, so that mounts in it are propagated to
child namespaces. Then it mounts the netns in a subdirectory there, so it can be accessed independently of any process.
However, once systemd starts our services in private namespaces, it is too late - even using <a href="https://www.freedesktop.org/software/systemd/man/latest/systemd.service.html#id-1.9.8" title="man systemd.service — Table 2. Special executable prefixes">the <code class="language-plaintext highlighter-rouge">+</code> prefix</a>
to elevate our commands beyond these namespaces doesn’t seem to work, and the mounts aren’t propagated correctly.</p>

<p>So this should be something that’s done before our services start. I first tried using a separate <code class="language-plaintext highlighter-rouge">netns-default</code>
service just for naming the original netns. Once the initial setup was done, one would think that <code class="language-plaintext highlighter-rouge">ip netns attach</code>
should then start working even in restricted services if run with elevated privileges. <em>Quelle surprise</em>, <code class="language-plaintext highlighter-rouge">ip</code> tries to
do the <code class="language-plaintext highlighter-rouge">mount</code> shenanigans all over again and fails:</p>

<div class="language-plaintext highlighter-rouge"><div class="highlight"><pre class="highlight"><code>ip[471]: mount --make-shared /var/run/netns failed: Operation not permitted
</code></pre></div></div>

<p>Then I fell back to using this in the VPN service override:</p>

<div class="language-plaintext highlighter-rouge"><div class="highlight"><pre class="highlight"><code>ExecStartPost=/usr/bin/ln -sf /proc/${MAINPID}/ns/net /var/run/netns/vpn
</code></pre></div></div>

<p>This way, the netns will be accessible at least as long as the VPN process stays alive.  After thinking a bit more, I
decided to go for a <em>third</em> service:</p>

<figure class="highlight"><pre><code class="language-shell" data-lang="shell"><table class="rouge-table"><tbody><tr><td class="gutter gl"><pre class="lineno">1
2
3
4
5
6
7
8
9
10
11
12
13
14
</pre></td><td class="code"><pre><span class="c"># /etc/systemd/system/netns-vpn-post.service</span>
<span class="o">[</span>Unit]
<span class="nv">Description</span><span class="o">=</span>VPN network namespace <span class="o">(</span>post<span class="o">)</span>
<span class="nv">ConditionPathExists</span><span class="o">=!</span>/var/run/netns/vpn
<span class="nv">After</span><span class="o">=</span>&lt;vpn&gt;.service

<span class="o">[</span>Install]
<span class="nv">WantedBy</span><span class="o">=</span>&lt;vpn&gt;.service

<span class="o">[</span>Service]
<span class="nv">Type</span><span class="o">=</span>oneshot
<span class="nv">RemainAfterExit</span><span class="o">=</span><span class="nb">yes</span>
<span class="c"># Hat-tip to A.B. here: https://serverfault.com/a/1097323/229499</span>
<span class="nv">ExecStartPre</span><span class="o">=</span>:/bin/bash <span class="nt">-c</span> <span class="s1">'declare $(systemctl show --property MainPID &lt;vpn&gt;.service); ip netns attach vpn $MainPID'</span>
</pre></td></tr></tbody></table></code></pre></figure>

<p>This service doesn’t have to deal with private namespaces, and just sets up the name using <code class="language-plaintext highlighter-rouge">ip netns attach</code>. Note the
<code class="language-plaintext highlighter-rouge">:</code> at the start of the command so that systemd leaves <code class="language-plaintext highlighter-rouge">$</code> alone. Now everything looks nice:</p>

<div class="language-plaintext highlighter-rouge"><div class="highlight"><pre class="highlight"><code>% ip netns list
default
vpn (id: 0)
</code></pre></div></div>

<p>In the end, though, I went with just disabling <code class="language-plaintext highlighter-rouge">PrivateMounts</code> for the netns setup service, for which it doesn’t really
matter, and running the <code class="language-plaintext highlighter-rouge">ip netns attach</code> commands there. Having <code class="language-plaintext highlighter-rouge">PrivateMounts</code> for the services run in that service
might be fine, but for this one, it really was more trouble than it was worth.</p>]]></content><author><name></name></author><category term="tech" /><category term="linux" /><summary type="html"><![CDATA[Wrestling with private mounts to name a netns]]></summary></entry><entry><title type="html">Private Mounts in systemd and netns</title><link href="https://muru.dev/2023/08/26/netns-systemd.html" rel="alternate" type="text/html" title="Private Mounts in systemd and netns" /><published>2023-08-26T00:00:00+00:00</published><updated>2023-08-26T00:00:00+00:00</updated><id>https://muru.dev/2023/08/26/netns-systemd</id><content type="html" xml:base="https://muru.dev/2023/08/26/netns-systemd.html"><![CDATA[<p>My <a href="/2020/12/03/poking-pi-ii.html" title="VPNs and Network Namespaces">previous post</a> originally used bind mounts (<code class="language-plaintext highlighter-rouge">mount --bind /proc/self/ns/net /var/run/netns/vpn</code>) instead of
symbolic links (<code class="language-plaintext highlighter-rouge">ln -sf /proc/self/ns/net /var/run/netns/vpn</code>) to name the private namespace. The <code class="language-plaintext highlighter-rouge">mount</code> method created
two complications:</p>

<ol>
  <li>The <code class="language-plaintext highlighter-rouge">/var/run/netns/vpn</code> had to exist (the old unit ran <code class="language-plaintext highlighter-rouge">ip netns add vpn</code> to create yet another namespace).</li>
  <li>Mounts are problematic with <code class="language-plaintext highlighter-rouge">PrivateMounts=yes</code>.</li>
</ol>

<p>The latter only became a problem with <a href="https://github.com/systemd/systemd/releases/tag/v254">systemd’s v254 release</a>:</p>

<blockquote>
  <div class="language-plaintext highlighter-rouge"><div class="highlight"><pre class="highlight"><code>* PrivateNetwork=yes and NetworkNamespacePath= now imply
  PrivateMounts=yes unless PrivateMounts=no is explicitly specified.
</code></pre></div>  </div>
</blockquote>

<p>Since I run Arch Linux, I get the latest versions of systemd, and one day this setup just started failing, because:</p>

<blockquote>
  <p>File system namespaces are set up individually for each process forked off by the service manager. Mounts established
in the namespace of the process created by <code class="language-plaintext highlighter-rouge">ExecStartPre=</code> will hence be cleaned up automatically as soon as that
process exits and will not be available to subsequent processes forked off for <code class="language-plaintext highlighter-rouge">ExecStart=</code> (and similar applies to
the various other commands configured for units).</p>

  <p>— <em><a href="https://www.freedesktop.org/software/systemd/man/systemd.exec.html#PrivateMounts="><code class="language-plaintext highlighter-rouge">man 5 systemd.exec</code></a></em>, <code class="language-plaintext highlighter-rouge">PrivateMounts=</code></p>
</blockquote>

<p>This meant that while I had a <code class="language-plaintext highlighter-rouge">vpn</code> netns created, the commands that I was running assuming that it was in the <code class="language-plaintext highlighter-rouge">vpn</code>
netns were actually being run in the unit’s private namespace. So, when the VPN interface started up, there was nothing
useful in the netns. No <code class="language-plaintext highlighter-rouge">veth</code> devices, no route to the internet.</p>

<p>I solved this problem by:</p>

<ol>
  <li>Using symbolic links to name the namespace, and</li>
  <li>Using <code class="language-plaintext highlighter-rouge">JoinsNamespaceOf</code> instead of using name for the namespace in the other units.</li>
</ol>

<p>This actually improved and simplified the setup, in addition to not having to create the <code class="language-plaintext highlighter-rouge">vpn</code> netns unnecessarily:</p>

<ol>
  <li><code class="language-plaintext highlighter-rouge">JoinsNamespaceOf</code> directly expresses the relationship between the VPN service and the netns service.</li>
  <li>Any other services that should be in the namespace of the VPN service can now use
<code class="language-plaintext highlighter-rouge">JoinsNamespaceOf=openvpn-client@&lt;whatever&gt;</code>, instead of having to join some arbitrary namespace.</li>
</ol>

<p>This creates a nice tree of namespace relationships. The <code class="language-plaintext highlighter-rouge">vpn</code> name for the netns now exists only for convenience, for
when (if) I need to run <code class="language-plaintext highlighter-rouge">ip netns exec</code> to do something in it.</p>

<p>(Note that each unit that uses <code class="language-plaintext highlighter-rouge">JoinsNamespaceOf</code> must also have <code class="language-plaintext highlighter-rouge">PrivateNetwork</code> enabled.)</p>]]></content><author><name></name></author><category term="tech" /><category term="linux" /><summary type="html"><![CDATA[Fixing breakage due to systemd updates]]></summary></entry><entry><title type="html">Poking around a Pi: Part II</title><link href="https://muru.dev/2020/12/03/poking-pi-ii.html" rel="alternate" type="text/html" title="Poking around a Pi: Part II" /><published>2020-12-03T00:00:00+00:00</published><updated>2020-12-03T00:00:00+00:00</updated><id>https://muru.dev/2020/12/03/poking-pi-ii</id><content type="html" xml:base="https://muru.dev/2020/12/03/poking-pi-ii.html"><![CDATA[<p>A few weeks ago, I had occasion to find out how Docker overlay networks could be created manually, which led me to learn
more about network namespaces in Linux. I already knew the concepts behind various namespaces (user, PID, mount, etc.),
but this was the first time in a long time that I had occasion to set one up myself. In the process, I came up on one
solution to a problem that I’d been having recently: applying a VPN only to some applications.</p>

<!-- section -->

<aside>I know I promised to talk about Nextcloud in my last post over a year ago. However, in the months since, I had to
wipe and reinstall the Pi, and I ended up choosing not to install Nextcloud this time around. Instead, I connected it to
my TV, and installed Kodi. That has turned out to be far more useful for my purposes than Nextcloud ever was.</aside>

<p>Some time ago, I bought a subscription for Tunnelbear, and they support <a href="https://www.tunnelbear.com/blog/linux_support/" title="TunnelBear Befriends Penguins with Limited Linux Support">Linux via OpenVPN</a>. I started using
it on my Pi, but to my dismay, I found that the VPN routing prevented incoming connections from the internet from being
properly handled. This caused a couple of problems:</p>

<ol>
  <li>This broke SSH from outside.</li>
  <li>I could no longer run an externally-accessible web server from the Pi. As a side-effect, Let’s Encrypt certificate
renewal via certbot could no longer be automated, since it would only work when the VPN was off.</li>
</ol>

<p>The first could have been something of a deal-breaker, but since I accessed the Pi via SSH from the internet only
rarely, I was willing to let the VPN run as-is for the time being. I investigated online, and most solutions seemed to
recommend setting up another routing table and using <code class="language-plaintext highlighter-rouge">iptables</code> to mark the traffic (via, e.g., matching the user) to
use the new routing table. I didn’t find this particularly appealing - I didn’t want to go about running some process
under a different group or user, and I didn’t want to mess with whatever routing OpenVPN deemed appropriate. Different
strokes and all…</p>

<!-- section -->

<p>Enter network namespaces aka netns. The idea itself is old (see, for example, <a href="http://www.evolware.org/?p=293">this 7-year-old
post</a>);  I just happened to stumble upon it recently. In short, the key element driving
the netns solution is the Virtual Ethernet Device aka <a href="https://man7.org/linux/man-pages/man4/veth.4.html"><code class="language-plaintext highlighter-rouge">veth</code></a>. These are pairs of linked devices, where:</p>

<blockquote>
  <p>Packets transmitted on one device in the pair are immediately received on the other device.</p>
</blockquote>

<p>By keeping each interface of a <code class="language-plaintext highlighter-rouge">veth</code> pair in different namespaces, we can have easy communication between the two. So,
we’ll have the default namespace, which is where we normally operate, and we will have a new namespace where the VPN
(and any applications that need the VPN) will operate.</p>

<!-- section -->

<p>The arcane incantations (to be invoked as root) involved are:</p>

<figure class="highlight"><pre><code class="language-shell" data-lang="shell"><table class="rouge-table"><tbody><tr><td class="gutter gl"><pre class="lineno">1
2
3
4
5
6
7
8
9
10
11
12
13
14
15
16
</pre></td><td class="code"><pre><span class="nv">NS_NAME</span><span class="o">=</span>vpn
ip netns add <span class="s2">"</span><span class="nv">$NS_NAME</span><span class="s2">"</span>
ip netns <span class="nb">exec</span> <span class="s2">"</span><span class="nv">$SHELL</span><span class="s2">"</span>
<span class="nb">ln</span> <span class="nt">-s</span> /proc/1/ns/net /var/run/netns/default
ip <span class="nb">link </span>add dev veth1 mtu 1500 <span class="nb">type </span>veth peer name veth2 mtu 1500
ip <span class="nb">link set </span>dev veth2 netns default
ip addr add dev veth1 10.0.0.1/24
ip <span class="nb">link set </span>veth1 up
ip netns <span class="nb">exec </span>default ip <span class="nb">link set </span>veth2 up
ip route add 192.168.1.2/32 dev veth1
ip route add default via 192.168.1.2
ip netns <span class="nb">exec </span>default ip route add 10.0.0.0/24 dev veth2
ip netns <span class="nb">exec </span>default iptables <span class="nt">-A</span> FORWARD <span class="nt">-i</span> veth2 <span class="nt">-o</span> eth0 <span class="nt">-j</span> ACCEPT
ip netns <span class="nb">exec </span>default iptables <span class="nt">-A</span> FORWARD <span class="nt">-o</span> veth2 <span class="nt">-i</span> eth0 <span class="nt">-j</span> ACCEPT
ip netns <span class="nb">exec </span>default iptables <span class="nt">-t</span> nat <span class="nt">-A</span> POSTROUTING <span class="nt">-s</span> 10.0.0.0/24 <span class="nt">-o</span> eth0 <span class="nt">-j</span> MASQUERADE
sysctl <span class="nt">-w</span> net.ipv4.ip_forward<span class="o">=</span>1
</pre></td></tr></tbody></table></code></pre></figure>

<p>What do these commands do? Let’s examine them block by block.</p>

<ol>
  <li>
    <p>Set up the namespace and enter it:</p>

    <div class="language-sh highlighter-rouge"><div class="highlight"><pre class="highlight"><code> <span class="nv">NS_NAME</span><span class="o">=</span>vpn
 ip netns add <span class="s2">"</span><span class="nv">$NS_NAME</span><span class="s2">"</span>
 ip netns <span class="nb">exec</span> <span class="s2">"</span><span class="nv">$SHELL</span><span class="s2">"</span>
 <span class="nb">ln</span> <span class="nt">-s</span> /proc/1/ns/net /var/run/netns/default
</code></pre></div>    </div>
    <p>Here, we create a new network namespace named “<code class="language-plaintext highlighter-rouge">vpn</code>”, and start a shell in it. Since the default namespace probably
 doesn’t have a name, we set a name for it (oddly enough, <code class="language-plaintext highlighter-rouge">default</code>).</p>
  </li>
  <li>
    <p>Create the veth pair and move one to the default namespace (we’re already in a shell in the new namespace, remember):</p>

    <div class="language-plaintext highlighter-rouge"><div class="highlight"><pre class="highlight"><code> ip link add dev veth1 mtu 1500 type veth peer name veth2 mtu 1500
 ip link set dev veth2 netns default
</code></pre></div>    </div>
  </li>
  <li>
    <p>Bring up our veth interfaces and assign them IPs:</p>

    <div class="language-plaintext highlighter-rouge"><div class="highlight"><pre class="highlight"><code> ip addr add dev veth1 10.0.0.1/24
 ip link set veth1 up
 ip netns exec default ip link set veth2 up
</code></pre></div>    </div>
  </li>
  <li>
    <p>Route to the external network via your proper network interface (here, I’m assuming its IP is 192.168.1.2) and
route back:</p>

    <div class="language-plaintext highlighter-rouge"><div class="highlight"><pre class="highlight"><code> ip route add 192.168.1.2/32 dev veth1
 ip route add default via 192.168.1.2
 ip netns exec default ip route add 10.0.0.0/24 dev veth2
</code></pre></div>    </div>
  </li>
  <li>
    <p>Set up packet forwarding using iptables:</p>

    <div class="language-plaintext highlighter-rouge"><div class="highlight"><pre class="highlight"><code> ip netns exec default iptables -A FORWARD -i veth2 -o eth0 -j ACCEPT
 ip netns exec default iptables -A FORWARD -o veth2 -i eth0 -j ACCEPT
 ip netns exec default iptables -t nat -A POSTROUTING -s 10.0.0.0/24 -o eth0 -j MASQUERADE
</code></pre></div>    </div>
  </li>
  <li>
    <p>Enable IPv4 forwarding using <code class="language-plaintext highlighter-rouge">sysctl</code>:</p>

    <div class="language-plaintext highlighter-rouge"><div class="highlight"><pre class="highlight"><code> sysctl -w net.ipv4.ip_forward=1
</code></pre></div>    </div>
  </li>
</ol>

<p>Then run OpenVPN in this network namespace (for example, by running the <code class="language-plaintext highlighter-rouge">openvpn</code> command itself here, or by using
systemd to link it to this namespace).</p>

<!-- section -->

<p>I personally use systemd to set the whole thing up at boot. First, there’s the one-shot service to set up the
namespace:</p>

<figure class="highlight"><pre><code class="language-shell" data-lang="shell"><table class="rouge-table"><tbody><tr><td class="gutter gl"><pre class="lineno">1
2
3
4
5
6
7
8
9
10
11
12
13
14
15
16
17
18
19
20
21
22
23
24
25
26
27
28
29
</pre></td><td class="code"><pre><span class="c"># /etc/systemd/system/netns-vpn.service</span>
<span class="o">[</span>Unit]
<span class="nv">Description</span><span class="o">=</span>VPN network namespace
<span class="nv">ConditionPathExists</span><span class="o">=!</span>/tmp/netns-vpn-concluded

<span class="o">[</span>Service]
<span class="nv">Type</span><span class="o">=</span>oneshot
<span class="nv">RemainAfterExit</span><span class="o">=</span><span class="nb">yes</span>

<span class="c"># Ask systemd to create a network namespace</span>
<span class="nv">PrivateNetwork</span><span class="o">=</span><span class="nb">yes</span>
<span class="c"># But not private mounts</span>
<span class="nv">PrivateMounts</span><span class="o">=</span>no

<span class="nv">ExecStartPre</span><span class="o">=</span>/usr/sbin/ip netns attach default 1
<span class="nv">ExecStartPre</span><span class="o">=</span>:/bin/sh <span class="nt">-c</span> <span class="s1">'ip netns attach vpn $$'</span>
<span class="nv">ExecStartPre</span><span class="o">=</span>/usr/sbin/ip <span class="nb">link </span>add dev veth1 mtu 1500 <span class="nb">type </span>veth peer name veth2 mtu 1500
<span class="nv">ExecStartPre</span><span class="o">=</span>/usr/sbin/ip <span class="nb">link set </span>dev veth2 netns default
<span class="nv">ExecStartPre</span><span class="o">=</span>/usr/sbin/ip addr add dev veth1 10.0.0.1/24
<span class="nv">ExecStartPre</span><span class="o">=</span>/usr/sbin/ip <span class="nb">link set </span>veth1 up
<span class="nv">ExecStartPre</span><span class="o">=</span>/usr/sbin/ip netns <span class="nb">exec </span>default /usr/sbin/ip <span class="nb">link set </span>veth2 up
<span class="nv">ExecStartPre</span><span class="o">=</span>/usr/sbin/ip route add 192.168.1.2/32 dev veth1
<span class="nv">ExecStartPre</span><span class="o">=</span>/usr/sbin/ip route add default via 192.168.1.2
<span class="nv">ExecStartPre</span><span class="o">=</span>/usr/sbin/ip netns <span class="nb">exec </span>default /usr/sbin/ip route add 10.0.0.0/24 dev veth2
<span class="nv">ExecStartPre</span><span class="o">=</span>/usr/sbin/ip netns <span class="nb">exec </span>default /usr/sbin/iptables <span class="nt">-A</span> FORWARD <span class="nt">-i</span> veth2 <span class="nt">-o</span> eth0 <span class="nt">-j</span> ACCEPT
<span class="nv">ExecStartPre</span><span class="o">=</span>/usr/sbin/ip netns <span class="nb">exec </span>default /usr/sbin/iptables <span class="nt">-A</span> FORWARD <span class="nt">-o</span> veth2 <span class="nt">-i</span> eth0 <span class="nt">-j</span> ACCEPT
<span class="nv">ExecStartPre</span><span class="o">=</span>/usr/sbin/ip netns <span class="nb">exec </span>default /usr/sbin/iptables <span class="nt">-t</span> nat <span class="nt">-A</span> POSTROUTING <span class="nt">-s</span> 10.0.0.0/24 <span class="nt">-o</span> eth0 <span class="nt">-j</span> MASQUERADE

<span class="nv">ExecStart</span><span class="o">=</span>/usr/bin/touch /tmp/netns-vpn-concluded
</pre></td></tr></tbody></table></code></pre></figure>

<p>It differs a bit from the code above, because this uses the network namespace that systemd can set up for a service. The
<code class="language-plaintext highlighter-rouge">sysctl</code> knob can be set at boot using a file in <code class="language-plaintext highlighter-rouge">/etc/sysctl.d</code>.</p>

<p>Then use a drop-in to modify the OpenVPN service to use the same namespace:</p>

<figure class="highlight"><pre><code class="language-shell" data-lang="shell"><table class="rouge-table"><tbody><tr><td class="gutter gl"><pre class="lineno">1
2
3
4
5
6
7
8
</pre></td><td class="code"><pre><span class="o">==&gt;</span> /etc/systemd/system/openvpn-client@/override.conf &lt;<span class="o">==</span>
<span class="o">[</span>Service]
<span class="nv">PrivateNetwork</span><span class="o">=</span><span class="nb">yes</span>

<span class="o">[</span>Unit]
<span class="nv">JoinsNamespaceOf</span><span class="o">=</span>netns-vpn.service
<span class="nv">Requires</span><span class="o">=</span>netns-vpn.service
<span class="nv">After</span><span class="o">=</span>netns-vpn.service
</pre></td></tr></tbody></table></code></pre></figure>

<p>This runs all instances of the <code class="language-plaintext highlighter-rouge">openvpn-client</code> template service in the namespace created for the one-shot service.
You can, of course, make a template of the network namespace setup service, and have one for each instance of the
OpenVPN client.</p>

<p>A similar drop-in override can be used for other services (e.g., Kodi or a desktop session).</p>

<p class="danger">This doesn’t protect against the VPN dying and leaving your services directly connected via your network. I
think that can be bluntly handled by having an <code class="language-plaintext highlighter-rouge">ExecStopPost</code> for the OpenVPN client which removes the default route
altogether (and correspondingly have an <code class="language-plaintext highlighter-rouge">ExecStartPre</code> set up the default route instead of setting it in the one-shot
service).</p>

<!-- section -->

<h2 id="updates">Updates</h2>

<p>Since the time this post was originally published, I have updated the unit files above twice. Details on the updates can
be found in these follow-up posts:</p>

<ol>
  <li><a href="/2023/08/26/netns-systemd.html">Network Namespaces and systemd Private Mounts</a></li>
  <li><a href="/2024/03/25/netns-systemd-ii.html">Naming Network Namespaces in systemd Private Mounts</a></li>
</ol>]]></content><author><name></name></author><category term="tech" /><category term="linux" /><summary type="html"><![CDATA[Using a VPN only for a select group of applications (updated August 2023)]]></summary></entry><entry><title type="html">Poking around a Pi: Part I</title><link href="https://muru.dev/2019/06/30/poking-pi.html" rel="alternate" type="text/html" title="Poking around a Pi: Part I" /><published>2019-06-30T00:00:00+00:00</published><updated>2019-06-30T00:00:00+00:00</updated><id>https://muru.dev/2019/06/30/poking-pi</id><content type="html" xml:base="https://muru.dev/2019/06/30/poking-pi.html"><![CDATA[<p>Over a year ago, I got a <a href="https://www.amazon.co.jp/dp/B01CHJRAOK/ref=cm_sw_r_tw_dp_U_x_XnOcDb1XCNV0H" title="Amazon Japan link">Raspberry Pi 3B</a>. Yahoo! JAPAN has this nice
system called <a href="https://linotice.tumblr.com/post/180646706959/20181130">TechUP</a> for buying stuff (gadgets, books, subscriptions, etc.) to
improve your technical skills. A Pi is perfect — it’s well within the budget,
and you have lots of people using it for various projects, so there’s a lot of
material online that you can learn from. And the models are always increasing in
power — just look at the recently released Pi 4: a max of 4 GB of RAM
(potentially more), USB 3, and Gigabit Ethernet that doesn’t share buses with
the USB ports. Today, though, I’ll be talking about the Pi 3B and my experiments
with it.</p>

<p>It spent nearly a month collecting dust before I finally got around to booting
it. And when I did upgrade from polygonal tuits, I was faced with a tough
problem: which OS do I use?</p>

<ol>
  <li>Raspbian is pretty popular, and perhaps the first among equals. But: Stable
releases of Debian-based distros like Raspbian tend to be heavily outdated.
One of my goals with the Pi was to play with new software.
I could hunt down repositories, or build stuff myself, but ¯\_(ツ)_/¯</li>
  <li>Ubuntu’s main repositories don’t support ARM. That’s over on
<a href="http://ports.ubuntu.com/">http://ports.ubuntu.com/</a>. Even so, support in PPAs for ARM isn’t that
widespread.</li>
  <li>Arch officially only supports the amd64/x86-64 architecture (they <a href="https://www.archlinux.org/news/the-end-of-i686-support/">dropped
support for i686</a> some time ago). <a href="https://archlinuxarm.org/">ARM</a>, like i686, is supported
by the community. <a href="https://archlinuxarm.org/about/mirrors">Mirrors</a> are a bit of a problem. There are none in Japan.</li>
</ol>

<p>Instead of going for Raspbian or Ubuntu, I opted for installing Arch Linux.  I
ended up picking Arch because it is my daily driver on my PC, and I already have
a box running Ubuntu serving as a … server. It was time to see how Arch would
hold up.</p>

<!-- section -->

<h2 id="installation">Installation</h2>

<p>It’s been over a year since I installed it, so I don’t remember specifics of any
problems I had during the installation. I don’t think I had many — except maybe
<del>if</del> when I goofed up with some commands. I did have some concern that the
ARMv7 build that Arch Linux ARM recommended wouldn’t be good enough, but I think
things have mostly turned out just fine.</p>

<p>Ah, yes! Like an idiot, I tried my default way of booting for system
installations: using an USB drive. And was greeted with a blank screen. I think
I fiddled with the KVM switch at first, then tried connecting everything to the Pi instead of the
switch and I even tried flashing the disk a couple of times. Finally I Googled and
realized that a Pi does not boot from an USB drive unless <a href="https://www.raspberrypi.org/documentation/hardware/raspberrypi/bootmodes/msd.md">it has been
configured to do so</a> — <em>by booting from a microSD card.</em> That meant
buying one, and waiting a couple of days for its arrival.  Booting from the card
went fine: I finally saw the rainbow splash. (All told, it was about 6 weeks
since I bought the Pi that I first successfully booted it. Damn, I’m lazy.)</p>

<p>As I said before, Arch Linux itself worked pretty fine. I’d give it a Gold
rating (not Platinum), because I have had the occasional kernel panics over
the past year, about once every couple of months or so. For the moment, I have
stuck the <code class="language-plaintext highlighter-rouge">panic=10</code> bandaid on it.</p>

<p>The main issue — I can’t even really call it an issue — is that the
community’s preferred kernel is a bit old.  They track an LTS kernel, something
to do with custom firmware needed for some components. Since I don’t use most of
it — not the camera input, not the audio out, I don’t even run a GUI on it —
I think I could get away with running the latest, mainline kernel. Something to
test soon.  Shortly after I got the Pi, I wanted to try <a href="https://lwn.net/Articles/770991/">iwd</a>, the new wireless
network management daemon. However, the kernel in use then (4.12-ish, I think)
didn’t support it. The kernel is currently 4.19 (following Arch’s <code class="language-plaintext highlighter-rouge">linux-lts</code>),
where my PC runs 5.1. I think it does support iwd now, but I haven’t gotten
around to testing it yet.</p>

<!-- section -->

<h2 id="using-a-microsd-card">Using a microSD card</h2>

<p>Since I had to boot from a card anyway, I decided to go with it completely,
instead of configuring USB boot. This proved to be a mistake. I don’t know if it
was the card I’d bought (a <a href="https://store.shopping.yahoo.co.jp/jnh/TO3307M302EA.html">Toshiba M203</a>) or something with the Pi’s
I/O, but damn, the system was slow. Tab completion, listing files, running
commands — everything had a very noticeable, multi-second  delay. I mean, I
understand that the ARM CPU isn’t comparable to the i7 on my PC, but this was
slower than anything I’d used in the past decade, except for SSH connections over
mobile internet. I thought it might be the CPU, but later, I realized it was the
I/O from the card, when I attached a USB hard disk to it. Listing files on the
disk was noticeably faster than doing so on the card. Then I noticed that
essentially anything which touched the card turned slow, like it was nearing the
accretion disk of a black hole. I decided to stick with the card for the time
being, but it did lead to a lot of frustration.</p>

<p>I finally moved to a USB flash drive a couple of weeks ago, and things have
drastically improved. I couldn’t use my 8GB drive - it turned out to be just
a bit smaller than the 8GB microSD card. I could resize the partitions and all
that, but meh … I did have another 16GB one lying around. That one worked OK. I
had moved some stuff from the card to the hard drive for performance, but now I
have I moved them back to the flash drive, simplifying my setup.</p>

<!-- section -->

<h2 id="power">Power</h2>

<p>I have a power strip with a couple of USB ports for charging, and I used one of
those for powering the Pi. And so I have had warnings about “under voltage”
pretty much from day zero. Even if I did buy a dedicated power adaptor for the
Pi, I didn’t have spare slots on the power strip. I tried changing cables, using
shorter cables, etc. to no avail. I don’t know if the under-voltage situations had any really impact on anything.
They always seemed to be resolved in seconds, and I didn’t notice any relation
between their appearance and the aforementioned slow I/O. The one problem that
might be linked to it was a hard disk acting up.</p>

<p>I had two USB hard disks connected to the Pi, and the older one of them, a
Toshiba Canvio bought in May 2012, started having problems.  It would randomly
stop responding.  It could be the age of the drive, it could be the power —
I’m not sure. IIRC a consumer hard disk lasts around 5 years, so this one had
already gone above and beyond. I managed to get all useful data off via my PC,
though, which is why I doubt if it was really failing. I had another aged disk
fail on an unrelated system around the same time, and that one just started
spewing I/O errors all over the place (couldn’t even copy data reliably off it).
Or maybe I just experienced two failure modes of aging disks.</p>

<p>I decided to bite the bullet and get a dedicated power supply, but I didn’t feel
like getting just power supply for the Pi. If I was going to have to mess with
my current power setup, doing it just for the Pi felt like a waste. Instead,
I got <a href="https://www.amazon.co.jp/gp/product/B07PD1ZVLY/">a powered USB hub</a> a few weeks ago, which also had an additional
port for USB charging. I moved all the peripherals to it (except the flash drive
used to boot it) and used it to power the Pi as well. I haven’t had an
under-voltage situation since.</p>

<!-- section -->

<h2 id="what-next">What next?</h2>

<p>So, what did I do with this Pi? I’ll talk about the specifics in my next post.
But the tl;dr is this: I configured it to run Nextcloud, and in general function
as a file server with data on the hard disk.</p>

<p>It also serves as the gateway to my home. I have set up SSH (with only
public-key authentication allowed) and port-forwarded it over my router, so I
can access the Pi, and by extension (with some help from Wake-on-LAN) my PC as
well. A non-default SSH port means I don’t see <del>many</del> any bots knocking on the
SSH door.</p>

<p>Overall, I’m pretty happy with the Pi. I’d like to upgrade to the Pi 4, mainly
for USB 3 and Gigabit networking, but I can live with the current performance.
The main bottleneck is my Internet (upload bandwidth a measly 10 Mbps), and
there’s nothing that upgrading will <em>really</em> improve. I’d even say the Pi is
underutilized — I’m barely using 200MB of RAM most of time, and the CPU’s
mostly idle too. I’d say if you don’t have 4K media, a Pi 3B is a perfectly fine
media server.</p>]]></content><author><name></name></author><category term="tech" /><category term="linux" /><summary type="html"><![CDATA[Experiences with a Raspberry Pi 3B]]></summary></entry><entry><title type="html">Arch on Alienware: Part II</title><link href="https://muru.dev/2018/06/24/alien-itches.html" rel="alternate" type="text/html" title="Arch on Alienware: Part II" /><published>2018-06-24T00:00:00+00:00</published><updated>2018-06-24T00:00:00+00:00</updated><id>https://muru.dev/2018/06/24/alien-itches</id><content type="html" xml:base="https://muru.dev/2018/06/24/alien-itches.html"><![CDATA[<p>So, it’s been <a href="/2017/12/12/alien.html">half a year since</a> I got the Alienware Aurora R7, and I
have had my fair share of bugs and annoyances. Today, I’ll talk about a few of
those.</p>

<!-- section -->

<aside>

  <blockquote>
    <p>Every good work of software starts by scratching a developer’s personal itch.</p>
  </blockquote>

  <p>— <a href="http://www.catb.org/esr/writings/homesteading/cathedral-bazaar/ar01s02.html"><em>The Cathedral and the Bazaar</em></a>,<br />
Eric S. Raymond.</p>

</aside>

<h1 id="shutting-down">Shutting down</h1>

<p>
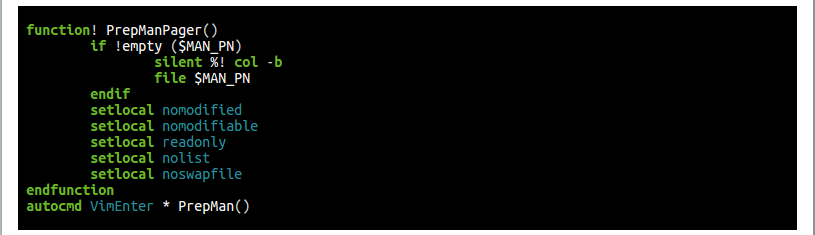
The Alienware series apparently has a fairly common  issue of panicking on
shutdown (<a href="https://helloworldproject.blogspot.jp/2016/11/installing-ubuntu-1610-on-alienware.html">1</a>, <a href="https://forum.manjaro.org/t/kernel-panic-at-shutdown/11054/6">2</a>, <a href="https://askubuntu.com/q/1008685/158442">3</a>, <a href="https://www.dell.com/community/Alienware-General/Alienware-Aurora-R6-Booting-Linux-on-PCIe-M-2/td-p/5520641/page/2">4</a>, <a href="https://www.reddit.com/r/Dell/comments/7j38lr/dell_aurora_r6_linux_mint_and_shutdown_issues/">5</a>). The apparent cause is something in the I2C
Designware module. The solution used to be [disabling it][21], but things have
changed since then, and now the Arch Linux kernel has it baked in instead of as
a module that could be blacklisted. With some help from <a href="https://unix.stackexchange.com/q/423797/70524">the Unix &amp; Linux Stack
Exchange</a>, that problem has been overcome. The solution is to blacklist a
kernel function, as Stephen Kitt suggested in February, and the correct function
was identified by Yurij Mikhalevich right around the end of May.</p>

<p>So, to fix the panic issue, I needed to add the following to the kernel boot
parameters:</p>

<div class="language-plaintext highlighter-rouge"><div class="highlight"><pre class="highlight"><code>initcall_blacklist=dw_i2c_init_driver
</code></pre></div></div>

<p>In the intervening months, I had my own hack around this: while trying to figure
out when exactly the offending driver was loaded, noticed that shutting down
worked fine if I booted directly to the systemd <code class="language-plaintext highlighter-rouge">poweroff.target</code>.  So I added
an additional EFI boot entry, which started the kernel with
<code class="language-plaintext highlighter-rouge">systemd.unit=poweroff.target</code>, and then wrote a short script that enabled a
one-time boot to that entry and restarted. So shutting down took a while longer,
but worked fine as long as I called that script.</p>

<!-- section -->

<h1 id="multi-monitor-and-audio">Multi-monitor and audio</h1>

<p>So my setup looks something like this<sup id="fnref:1" role="doc-noteref"><a href="#fn:1" class="footnote" rel="footnote">1</a></sup>  — with a horrible mess of
cables connecting the whole lot:</p>

<div class="language-plaintext highlighter-rouge"><div class="highlight"><pre class="highlight"><code>     +--------------------+
     |     Alien          |
     |                    |                                         +--------+
     +--------------------+                                         |        |
                                                                    |        |
  +-------------------+                                             |        |
  |                   |                                             |        |
  |                   |                                        +----+---+    |
  |                   |   +---+                                |Speakers|    |
  |                   |   |   |                                +----+---+    |
  |                   |   | M |                                     |        |
  |                   |   | o |                                     |        |
  |                   |   | n |                                     |        |
  |         Table     |   | i |                                     |   TV   |
  |                   |   | t |                                     |        |
  |                   |   | o |                                     |        |
  |                   |   | r |                                     |        |
  |                   |   |   |                                +----+---+    |
  |                   |   +---+                                |Speakers|    |
  |                   |                                        +----+---+    |
  |                   |                                             |        |
  +-------------------+                                             |        |
                                                                    |        |
                                                                    |        |
                                                                    +--------+
</code></pre></div></div>

<p>So my monitor, a 24” BenQ, is visually below the 46” Sony TV. The monitor is
smaller, but much closer than the TV, so reading is far easier on it.  As a
result, it is my primary display when using the PC. However, the speakers are
connected to the TV’s audio out, since I also use the TV via a Chromecast, and in
the past via an HDMI switch that connected it to my laptop. So it makes sense
for whatever’s using the TV to have its audio go via the speakers.</p>

<p>This is where the annoyance begins. Since both displays are connected via
HDMI<sup id="fnref:2" role="doc-noteref"><a href="#fn:2" class="footnote" rel="footnote">2</a></sup>, both are available for sound output (and the monitor has a built-in
speaker). Since the monitor is the primary, sound is usually preferentially
routed through it, on both Windows and Linux (with PulseAudio). Windows does a
better job of remembering after I select the TV as the output once. However, on
Linux, every time I switch display configuration (from mirror to extend and
<em>vice  versa</em>), which I do quite often depending on whether I am gaming (mirror)
or watching videos (extend), output is reset to the monitor. (Or worse, sometimes
it picks the PC’s S/PDIF output, which has nothing connected to it at all!)</p>

<p>Worse still, the sound settings are not at all helpful here:</p>

<p><img src="https://i.imgur.com/eri1Grj.png" alt="Sound Settings" /></p>

<p>Quick: which would be the TV and which would be the monitor? :unamused:</p>

<!-- section -->

<p>Thus, I have two problems (and regex ain’t one of them):</p>

<ol>
  <li>Quick switching between display arrangements (GNOME Shell doesn’t have
anything built-in for that, as far as I know).</li>
  <li>Ensuring that the TV is the sound source, no matter what the arrangement is.</li>
</ol>

<p>I tried fiddling with <code class="language-plaintext highlighter-rouge">~/.config/monitors.xml</code>, but it seems that file isn’t
watched for changes. So modifying that file doesn’t help. I tried an extension
for GNOME Shell, but I quickly ran in to problem (2) above. So once I again, I
settled on writing up scripts. Setting arrangements is  easy enough with
<code class="language-plaintext highlighter-rouge">xrandr</code>:</p>

<div class="language-sh highlighter-rouge"><div class="highlight"><pre class="highlight"><code>xrandr <span class="nt">--output</span> DP-1 <span class="nt">--primary</span> <span class="nt">--below</span> HDMI-0     <span class="c"># extend above</span>
xrandr <span class="nt">--output</span> DP-1 <span class="nt">--same-as</span> HDMI-0             <span class="c"># mirror</span>
</code></pre></div></div>

<p>Here, DP-1 is the monitor connected on the DisplayPort, and HDMI-0 is the TV on
(surprise, surprise!) HDMI. It’s not difficult to see which is which:</p>

<div class="language-plaintext highlighter-rouge"><div class="highlight"><pre class="highlight"><code>% xrandr                                                                                                                                                                                        :(
Screen 0: minimum 8 x 8, current 1920 x 2160, maximum 32767 x 32767
HDMI-0 connected 1920x1080+0+0 (normal left inverted right x axis y axis) 0mm x 0mm
   1920x1080     60.00*+  59.94    60.05    60.00
   1440x480      60.05
   1280x720      60.00    59.94
   720x480       59.94
   640x480       59.93
DP-0 disconnected (normal left inverted right x axis y axis)
DP-1 connected primary 1920x1080+0+1080 (normal left inverted right x axis y axis) 527mm x 296mm
   1920x1080     60.00*+  59.94    50.00    60.05    60.00    50.04
   1680x1050     59.95
   1600x900      60.00
   1280x1024     75.02    60.02
   1280x800      59.81
   1280x720      60.00    59.94    50.00
   1024x768      75.03    60.00
   800x600       75.00    60.32
   720x576       50.00
   720x480       59.94
   640x480       75.00    59.94    59.93
DP-2 disconnected (normal left inverted right x axis y axis)
DP-3 disconnected (normal left inverted right x axis y axis)
DP-4 disconnected (normal left inverted right x axis y axis)
DP-5 disconnected (normal left inverted right x axis y axis)
DP-1-1 disconnected (normal left inverted right x axis y axis)
HDMI-1-1 disconnected (normal left inverted right x axis y axis)
</code></pre></div></div>

<p>The (far newer) monitor has far more supported modes. So it’s easy to parse them
out and see which is which:</p>

<div class="language-sh highlighter-rouge"><div class="highlight"><pre class="highlight"><code>% xrandr |
   <span class="nb">awk</span> <span class="s1">'/connected/{name=$1; next} name &amp;&amp; /x/{count[name]++} END {for (i in count) print i, count[i]}'</span>
HDMI-0 5
DP-1 11
</code></pre></div></div>

<!-- section -->

<h2 id="pulseaudio">PulseAudio</h2>

<p>The tricky part, however, was PulseAudio. I find it confusing. There’s
<a href="http://manpages.ubuntu.com/manpages/bionic/man1/pactl.1.html"><code class="language-plaintext highlighter-rouge">pactl</code></a> and <a href="http://manpages.ubuntu.com/manpages/bionic/man1/pacmd.1.html"><code class="language-plaintext highlighter-rouge">pacmd</code></a>. There’s all those configuration files,
<code class="language-plaintext highlighter-rouge">default.pa</code> and whatever else, written in a custom format, from what I can tell.
Sinks, sources, ports, cards, …! ‘Tis enough to make one throw up their hands in
despair!</p>

<p>Also, looking at the <code class="language-plaintext highlighter-rouge">pamcd</code> and <code class="language-plaintext highlighter-rouge">pactl</code> outputs, it’s obvious that trying to
parse that deeply-nested structure using regex is just asking for trouble.
However, PA doesn’t have first-party libraries for accessing this data from
friendly languages like Python. There have been a few projects trying to expose
such an API, but they don’t seem well-maintained or extensive in coverage.
Worse yet, even though the <code class="language-plaintext highlighter-rouge">pactl</code> manpage says:</p>

<div class="language-plaintext highlighter-rouge"><div class="highlight"><pre class="highlight"><code> pactl  only  exposes  a  subset  of  the  available  operations.  For the
 full set use the pacmd(1).
</code></pre></div></div>

<p><code class="language-plaintext highlighter-rouge">pactl</code> actually seems to expose more information than  <code class="language-plaintext highlighter-rouge">pacmd</code>. For example,
here’s part of the output for <code class="language-plaintext highlighter-rouge">pactl list cards</code>:</p>

<div class="language-plaintext highlighter-rouge"><div class="highlight"><pre class="highlight"><code>        Active Profile: output:hdmi-stereo-extra1
        Ports:
                hdmi-output-0: HDMI / DisplayPort (priority: 5900, latency offset: 0 usec, available)
                        Properties:
                                device.icon_name = "video-display"
                                device.product.name = "BenQ GW2480
 "
                        Part of profile(s): output:hdmi-stereo
                hdmi-output-1: HDMI / DisplayPort 2 (priority: 5800, latency offset: 0 usec, available)
                        Properties:
                                device.icon_name = "video-display"
                                device.product.name = "SONY TV
     "
                        Part of profile(s): output:hdmi-stereo-extra1
</code></pre></div></div>

<p>The equivalent on <code class="language-plaintext highlighter-rouge">pacmd list-cards</code>:</p>

<div class="language-plaintext highlighter-rouge"><div class="highlight"><pre class="highlight"><code>        ports:
                hdmi-output-0: HDMI / DisplayPort (priority 5900, latency offset 0 usec, available: yes)
                        properties:
                                device.icon_name = "video-display"
                                device.product.name = "BenQ GW2480
 "
                hdmi-output-1: HDMI / DisplayPort 2 (priority 5800, latency offset 0 usec, available: yes)
                        properties:
                                device.icon_name = "video-display"
                                device.product.name = "SONY TV
     "
</code></pre></div></div>

<p>Two things of note:</p>

<ol>
  <li>A human-grokkable name (the product name) is available<sup id="fnref:3" role="doc-noteref"><a href="#fn:3" class="footnote" rel="footnote">3</a></sup> from PulseAudio!
(Those are, in fact, what Windows shows!) Why TF doesn’t the sound settings use
those?</li>
  <li><code class="language-plaintext highlighter-rouge">pacmd</code>, ostensibly the more “powerful” command, doesn’t show the profile
associated with each port. It’s probably hidden away in some other sub-command,
and I’d need to parse out the port name matching the product name and then go
hunting.</li>
</ol>

<p>At any rate, getting the correct profile for the output I want to use is now
easy with <code class="language-plaintext highlighter-rouge">pactl</code>:</p>

<div class="language-sh highlighter-rouge"><div class="highlight"><pre class="highlight"><code><span class="nv">tv</span><span class="o">=</span><span class="s2">"SONY"</span>
pactl list cards |
  <span class="nb">awk</span> <span class="nt">-v</span> <span class="s2">"tv=</span><span class="nv">$tv</span><span class="s2">"</span> <span class="s1">'$1 ~ /Name:/ {name = $2} /device.product.name/ &amp;&amp; ($0 ~ tv) {p = 1} p &amp;&amp; /Part of profile/ {print name, $NF; exit}'</span>
</code></pre></div></div>

<p>This gives the card name and the profile name, then I can do:</p>

<div class="language-sh highlighter-rouge"><div class="highlight"><pre class="highlight"><code><span class="nv">tv</span><span class="o">=</span><span class="s2">"SONY"</span>
<span class="nb">read</span> <span class="nt">-r</span> card profile &lt; &lt;<span class="o">(</span>pactl list cards | <span class="nb">awk</span> <span class="nt">-v</span> <span class="s2">"tv=</span><span class="nv">$tv</span><span class="s2">"</span> <span class="s1">'$1 ~ /Name:/ {name = $2} /device.product.name/ &amp;&amp; ($0 ~ tv) {p = 1} p &amp;&amp; /Part of profile/ {print name, $NF; exit}'</span><span class="o">)</span>
pacmd set-card-profile <span class="s2">"</span><span class="nv">$card</span><span class="s2">"</span> <span class="s2">"</span><span class="nv">$profile</span><span class="s2">"</span>
</code></pre></div></div>

<!-- section -->

<p>Now all I need to do is wrap these up in scripts, have the display arrangement
script set the sound output as well<sup id="fnref:4" role="doc-noteref"><a href="#fn:4" class="footnote" rel="footnote">4</a></sup>, and use <a href="https://extensions.gnome.org/extension/1154/top-bar-script-executor/">this neat extension</a> to add
a couple of icons to my panel, and bam! A click is all I need to switch profiles
or fix sound if some bug caused the sound to go wandering around.</p>

<hr />

<p>I think, all said and done, a better way would have been to use PA configuration
files to set a higher priority for the TV. But I can’t be arsed to learn the
configuration language. So: <code class="language-plaintext highlighter-rouge">¯\_(ツ)_/¯</code> My scripts work and I postpone PA for a
time when I have far more free time.</p>

<!-- section -->

<div class="footnotes" role="doc-endnotes">
  <ol>
    <li id="fn:1" role="doc-endnote">
      <p>ASCII boxes thanks to <a href="http://asciiflow.com/">http://asciiflow.com/</a>! <a href="#fnref:1" class="reversefootnote" role="doc-backlink">&#8617;</a></p>
    </li>
    <li id="fn:2" role="doc-endnote">
      <p>Well, one via DisplayPort (/HDMI adaptor) and the other by HDMI,
  technically, but both interfaces can do audio out, so both show up in the
  sound settings. <a href="#fnref:2" class="reversefootnote" role="doc-backlink">&#8617;</a></p>
    </li>
    <li id="fn:3" role="doc-endnote">
      <p>What’s with the traling newline and other whitsepace there, though? <a href="#fnref:3" class="reversefootnote" role="doc-backlink">&#8617;</a></p>
    </li>
    <li id="fn:4" role="doc-endnote">
      <p>With a 2-second <code class="language-plaintext highlighter-rouge">sleep</code> in between, to give time for PA to settle after
  display rearrangement. <a href="#fnref:4" class="reversefootnote" role="doc-backlink">&#8617;</a></p>
    </li>
  </ol>
</div>]]></content><author><name></name></author><category term="tech" /><category term="linux" /><summary type="html"><![CDATA[So, it’s been half a year since I got the Alienware Aurora R7, and I have had my fair share of bugs and annoyances. Today, I’ll talk about a few of those.]]></summary></entry><entry><title type="html">Arch on Alienware</title><link href="https://muru.dev/2017/12/12/alien.html" rel="alternate" type="text/html" title="Arch on Alienware" /><published>2017-12-12T00:00:00+00:00</published><updated>2017-12-12T00:00:00+00:00</updated><id>https://muru.dev/2017/12/12/alien</id><content type="html" xml:base="https://muru.dev/2017/12/12/alien.html"><![CDATA[<p>It’s been <a href="/2013/04/12/bonobo.html">4½ years since I bought my System76 laptop</a>, and it is showing its
age. Back in 2013, an NVIDIA GT670 MX was a pretty decent laptop graphics card
(which meant it couldn’t hold a candle to the desktop graphics cards). But I was
able to play <em>Hitman: Absolution</em>, the various <em>Mass Effect</em> games, <em>Tomb
Raider</em> and so on on it, and with OK graphics levels and resolutions. Fast
forward to 2017, and we have <em>HITMAN</em>, <em>Mass Effect: Andromeda</em>, <em>Assassin’s
Creed: Origins</em>, and the 670MX really struggled with them (I don’t have
<em>Origins</em>, but it struggled with <em>Unity</em>). And so I decided to upgrade. After
casting my net far and wide, I decided against going for a laptop again. My
current laptop is functioning pretty much as a desktop<sup id="fnref:1" role="doc-noteref"><a href="#fn:1" class="footnote" rel="footnote">1</a></sup>, so I might as well
get another desktop.</p>

<p>This time around, I decided to go for the best graphics card I could sanely get
(so, no Titan). That’s the <a href="https://arstechnica.com/gadgets/2017/03/nvidia-gtx-1080-ti-review/">1080 Ti</a> at the moment, with 11 GB of
GDDR5 graphics memory! I considered System76 once again, which did have models
supporting the 1080Ti. But … Dell had a discount going on the Alienware Aurora
R7 (<a href="https://arstechnica.com/gadgets/2016/10/alienware-aurora-review-gaming-pc/">Ars Technica review</a> of the 2016 model). After considering the
discount, shipping charges and support options (Dell had a good discount going
on accidental and on-site support coverage as well), Dell was proving to be
cheaper, and I finally opted for it. Ordered, shipped and received in 2 weeks!</p>

<p>Specs:</p>

<ul>
  <li>Intel® Core™ i7 8700 (6 core/12 threads, 12 MB cache, 4.6 GHz max)</li>
  <li>NVIDIA® GeForce® GTX 1080 Ti 11GB GDDR5X</li>
  <li>256GB M.2 PCIe Toshiba SSD</li>
  <li>2TB 7200RPM SATA 6Gb/s Seagate HDD</li>
  <li>16 GB dual-channel DDR4 @ 2666 Mhz (2x 8 GB)</li>
  <li>A Blu-ray reader/writer<sup id="fnref:2" role="doc-noteref"><a href="#fn:2" class="footnote" rel="footnote">2</a></sup></li>
  <li>7 USB 3.0-A ports (3 in front, 4 back)<sup id="fnref:3" role="doc-noteref"><a href="#fn:3" class="footnote" rel="footnote">3</a></sup></li>
  <li>5 USB 2.0-A ports (all in the back)</li>
  <li>2 USB 3.0-C ports (one each front and back)</li>
  <li>1 HDMI port and 4 DisplayPorts</li>
  <li>Killer 1535 802.11ac 2x2 WiFi &amp; Bluetooth 4.1</li>
  <li>850 W PSU, liquid-cooled chassis</li>
  <li>14 kgs!<sup id="fnref:4" role="doc-noteref"><a href="#fn:4" class="footnote" rel="footnote">4</a></sup></li>
</ul>

<p>It came with Windows 10 Pro, and setting it up was pleasant. Logged in with my
Microsoft account synced my theme and wallpapers (a nice touch). Set about
installing Steam, other software I commonly use on Windows, and, of course, WSL.
Installed <em>HITMAN</em>, cranked up the settings to Ultra at 1080p, and ran the
benchmark to get an average of ~59 FPS! That’s head and shoulders above whatever
the 670MX could do at low-mid graphics. (The min was 4 FPS, but that came from a
stutter right at the very beginning). Even discounting the FPS values, the
benchmark looked smooth and clear in a way it never did on my laptop. Installed
<em>Assassin’s Creed: Unity</em> - no problems with that one either.</p>

<p>Of course, my setting up didn’t end there. The main quest was yet to be done:
installing Linux.</p>

<!-- section -->

<h2 id="setting-up-arch-linux">Setting up Arch Linux</h2>

<p>I must admit I had my worries about how well this thing would run Linux. The
network card name (Killer?!) didn’t particularly inspire confidence, and that’s
where most problems occur in a Linux setup - the LAN, WiFi and Bluetooth. And you
don’t often to get hear about people running Linux with a 1080Ti. But if my
experience with the 670MX meant anything, graphics wouldn’t be too much of a
problem.</p>

<h3 id="uefi">UEFI</h3>

<p>Booting with a USB drive with Arch on it didn’t prove troublesome. Both the
usual methods (use Windows’ advanced reboot option to get to UEFI, and pressing
<kbd>Esc</kbd> during boot) worked and got me into the UEFI boot menu. As an
aside, the Alienware boot splash is a nicely understated logo that I really
liked. Couldn’t find an image that looked just like it, so I took a photo of it
and processed it a bit to get this:</p>

<p><img src="https://i.imgur.com/hCPyDT1.png" alt="" /></p>

<p>But that’s probably the best bit about the Alienware UEFI setup. The UEFI menu
itself is … disappointing. It didn’t support widescreen monitors, and I have
seen a few UEFI systems that do, so there’s that. Many UEFI systems also support
screenshots, but this one doesn’t.</p>

<p>I needed to disable Secure Boot to get Arch to boot, as expected. Disabling
Secure Boot enabled legacy boot as well, and the legacy boot splash is somewhat
crappy. I didn’t want legacy boot, so I disabled that.</p>

<p>Once I selected the USB disk, Arch booted up right quick.</p>

<!-- section -->

<h3 id="partitioning">Partitioning</h3>

<p>I’d shrunk the partitions that already existed, to split the ~200 GB Windows
partition on the SSD in half, and to carve out a 500 GB space on the 2 TB disk.
There used to be a time when I thought more partitions were a good thing, and
I’d keep my data neatly divided into separate partitions (games on one, videos
on another, etc.). When I last upgraded my laptop, adding a 1 TB disk to (in
addition to the 500 GB it came with and the 500 GB disk from my older laptop),
my partition layout looked like this:</p>

<div class="language-plaintext highlighter-rouge"><div class="highlight"><pre class="highlight"><code>~ lsblk -o NAME,SIZE,FSTYPE,TYPE,MOUNTPOINT
NAME          SIZE FSTYPE            TYPE  LABEL       MOUNTPOINT
sda         931.5G                   disk
├─sda1       49.2G ntfs              part  Windows8
├─sda2        804M ntfs              part
├─sda3        500G ntfs              part  Downloads   /home/muru/Downloads
└─sda4      381.5G ntfs              part  Stuff       /home/muru/Stuff
sdb         465.8G linux_raid_member disk  ica-ext:0
└─md127     931.5G                   raid0
  ├─md127p1    40G ext4              md    arch        /
  ├─md127p2   100G ext4              md    devel       /home/muru/dev
  ├─md127p3   300G ext4              md    var         /home/muru/var
  ├─md127p4 483.5G ext4              md    archives    /home/muru/archives
  └─md127p5     8G swap              md                [SWAP]
sdc         465.8G linux_raid_member disk  ica-ext:0
└─md127     931.5G                   raid0
  ├─md127p1    40G ext4              md    arch        /
  ├─md127p2   100G ext4              md    devel       /home/muru/dev
  ├─md127p3   300G ext4              md    var         /home/muru/var
  ├─md127p4 483.5G ext4              md    archives    /home/muru/archives
  └─md127p5     8G swap              md                [SWAP]
</code></pre></div></div>

<p>In hindsight, that is just … insane. All those partitions meant that I soon ran
out of space in some of them. And of course, naïve as I was, I only granted
~50GB to Windows. This time around, I eschewed all that:</p>

<div class="language-plaintext highlighter-rouge"><div class="highlight"><pre class="highlight"><code>~ lsblk -o NAME,SIZE,FSTYPE,TYPE,LABEL,MOUNTPOINT /dev/sda /dev/nvme0n1
NAME          SIZE FSTYPE TYPE LABEL       MOUNTPOINT
sda           1.8T        disk
├─sda1        128M        part
├─sda2        1.3T ntfs   part Downloads   /home/muru/Downloads
└─sda3        500G ext4   part dev         /home/muru/dev
nvme0n1     238.5G        disk
├─nvme0n1p1   500M vfat   part ESP         /boot
├─nvme0n1p2   128M        part
├─nvme0n1p3 124.5G ntfs   part OS
├─nvme0n1p4   450M ntfs   part WINRETOOLS
├─nvme0n1p5  11.9G ntfs   part Image
├─nvme0n1p6     1G ntfs   part DELLSUPPORT
└─nvme0n1p7   100G ext4   part arch        /
</code></pre></div></div>

<p>Aside from the partitions already present, I added just two. Not even a swap
partition. Another upgrade I’d done to my laptop was to add 16 GB RAM to it,
for a total of 24 GB. And since then, I noted that swap was never used and I
don’t think I have seen it use more than 16 GB RAM. Even if I need swap, I’ll
probably use a swap file. No hibernation for me.</p>

<!-- section -->

<h3 id="installing">Installing</h3>

<p>After mounting, I realized that I’d forgotten to check the part that I’d worried
most about: the network. And to my pleasant surprise, <em>both</em> LAN and WiFi were
working perfectly fine OOTB:</p>

<div class="language-plaintext highlighter-rouge"><div class="highlight"><pre class="highlight"><code># lspci | grep -i net
05:00.0 Network controller: Qualcomm Atheros QCA6174 802.11ac Wireless Network Adapter (rev 32)
06:00.0 Ethernet controller: Qualcomm Atheros Killer E2500 Gigabit Ethernet Controller (rev 10)
</code></pre></div></div>

<p>I’d never heard of “Killer” network cards before, and I didn’t look them up
before I ordered, figuring I’d work something out if the card turned out to be
poorly supported. But nah, we’ve plain old Qualcomm Atheros here.</p>

<p>It was a simple matter of:</p>

<div class="language-plaintext highlighter-rouge"><div class="highlight"><pre class="highlight"><code>mount /dev/nvme0n1p7 /mnt
mkdir -p /mnt/boot/EFI
mount /dev/nvme0n1p1 /mnt/boot/EFI
pacstrap /mnt base base-devel gnome
</code></pre></div></div>
<p>And the usual steps in <a href="https://wiki.archlinux.org/index.php/Installation_guide">the Installation Guide</a>. (I’d accidentally
mounted the Windows partition instead of the Linux one on <code class="language-plaintext highlighter-rouge">/mnt</code>, but <code class="language-plaintext highlighter-rouge">pacstrap</code>
is non-destructive, so no harm done).</p>

<p>One thing I intended to  do this time was to skip GRUB and boot directly from
UEFI. This is possible because the Linux kernel from Arch has <a href="https://wiki.archlinux.org/index.php/EFISTUB#Using_UEFI_directly">EFISTUB</a>. While
using <code class="language-plaintext highlighter-rouge">efibootmgr</code> to set this up, I realized that the ESP was best mounted on
<code class="language-plaintext highlighter-rouge">/boot</code>, since the only thing <code class="language-plaintext highlighter-rouge">/boot</code> contained was the kernel image and the
initramfs, both of which had to be copied to the ESP anyway. So, remounting
<code class="language-plaintext highlighter-rouge">/mnt/boot</code>, and using these:</p>

<div class="language-plaintext highlighter-rouge"><div class="highlight"><pre class="highlight"><code>kernel_params="root=UUID=e5018f7e-5838-4a47-b146-fc1614673356 rw initrd=/initramfs-linux.img"
efibootmgr --disk /dev/nvme0n1 --part 1 --create --gpt --label "Arch Linux" --loader /vmlinuz-linux.efi --unicode "$kernel_params"
</code></pre></div></div>

<p>I got a new UEFI boot entry created and set as default automatically. The
command is long-winded enough that I saved it to file in root’s home directory,
which turned out to be pretty handy later.</p>

<p>Next step was to edit <code class="language-plaintext highlighter-rouge">/etc/mkinitcpio.d/linux</code> to get it to create the
initramfs files in the locations listed above directly (using <a href="https://wiki.archlinux.org/index.php/EFI_System_Partition#Using_mkinitcpio_hook_.282.29">the mkinitcpio(2)
method from the Arch Wiki</a>).</p>

<p>Timezone set, <code class="language-plaintext highlighter-rouge">fstab</code> created,  hostname set … and reboot!</p>

<!-- section -->

<h3 id="borking">Borking</h3>

<p>Bork. Rebooting didn’t work, it looks like I messed up the boot entry. I’d
missed the part where the paths were supposed to be rooted at the ESP partition.
So, rebooting back to the USB, chrooting again, and:</p>
<div class="language-plaintext highlighter-rouge"><div class="highlight"><pre class="highlight"><code>kernel_params="root=UUID=e5018f7e-5838-4a47-b146-fc1614673356 rw initrd=/EFI/arch/initramfs-linux.img"
efibootmgr --disk /dev/nvme0n1 --part 1 --create --gpt --label "Arch Linux" --loader /EFI/arch/vmlinuz-linux.efi --unicode "$kernel_params"
</code></pre></div></div>

<p>Reboot again, and I’m dropped into a TTY. :disappointed: I had installed <code class="language-plaintext highlighter-rouge">gnome</code>
after all. Of course, I forgot that Arch doesn’t automatically enable services,
so logging in, and <code class="language-plaintext highlighter-rouge">systemctl enabla --now gdm</code> later,
I had … GDM crashing in a loop. I had both my TV and my monitor connected, so I
tried disconnecting my TV, which stabilized GNOME and allowed me to login.
Turns out GDM itself runs in Wayland, and while Wayland didn’t have problems on
a running on a single screen, a dual display setup caused it to crash.</p>

<p>So, getting it to <a href="https://wiki.archlinux.org/index.php/GDM#Use_Xorg_backend">use Xorg</a> instead:</p>

<div class="language-plaintext highlighter-rouge"><div class="highlight"><pre class="highlight"><code>sed -i '/WaylandEnable=false/s/^#//' /etc/gdm/custom.conf
</code></pre></div></div>
<p>And GDM worked fine with dual displays from then on.</p>

<p>Logging in, my next point of trouble: no networking! :sob: Panicked, I checked
<code class="language-plaintext highlighter-rouge">ip a</code> and <code class="language-plaintext highlighter-rouge">lspci</code> to realise that the devices were detected fine, but I’d
forgotten to install NetworkManager. A quick run of <code class="language-plaintext highlighter-rouge">dhcpd</code> later, I had
network.</p>

<h3 id="steam">Steam</h3>

<p>After that, it was relatively simple to install the other software that I usually
use, and setup a LAN cross-connection to my laptop to start copying files (I
used <code class="language-plaintext highlighter-rouge">tar c | nc</code>/<code class="language-plaintext highlighter-rouge">nc -l | tar x</code> for speed). I ran into some trouble getting
Steam to start, turned out to be missing 32-bit libraries:</p>

<div class="language-plaintext highlighter-rouge"><div class="highlight"><pre class="highlight"><code>libXtst.so.6
libXrandr.so.2
libgobject-2.0.so.0
libglib-2.0.so.0
libgio-2.0.so.0
libgtk-x11-2.0.so.0
libpulse.so.0
libgdk_pixbuf-2.0.so.0
</code></pre></div></div>

<p>Later on, <code class="language-plaintext highlighter-rouge">vdui2.so</code> couldn’t be loaded. Then curl wasn’t loaded.</p>

<p>All told, I needed to install:</p>

<div class="language-plaintext highlighter-rouge"><div class="highlight"><pre class="highlight"><code># xargs -L1 -a ~muru/dev/steam-libs pkgfile -s | grep multi
multilib/lib32-libxtst
multilib/lib32-libxrandr
multilib/lib32-glib2
multilib/lib32-gtk2
multilib/lib32-libpulse
multilib/lib32-gdk-pixbuf2
# And
lib32-openal
lib32-curl
</code></pre></div></div>

<p><code class="language-plaintext highlighter-rouge">steam-native</code> still refuses to start, but <code class="language-plaintext highlighter-rouge">steam-runtime</code> works well enough.</p>

<p>And finally:</p>

<p><img src="https://i.imgur.com/QmHeTwb.jpg" alt="Imgur" /></p>

<p>54 FPS! A 10% drop compared to Windows, but still pretty good for a port.
My gaming will no longer be as frustrating as it was before. :sunglasses:
:neckbeard:</p>

<!-- section -->

<p>Who knew an Alienware would be so comfortable for Linux? Besides goof-ups I made
because I hadn’t installed Arch in ages and didn’t pay attention to the Wiki, it
was a pretty easy install. It would have been easier still if I’d gone for
Ubuntu, I suspect. A far cry from some of the laptops I have installed Linux on
for friends, maybe the year of the Linux desktop is indeed at hand.</p>

<!-- section -->

<div class="footnotes" role="doc-endnotes">
  <ol>
    <li id="fn:1" role="doc-endnote">
      <p>Not because of battery issues, but because I burnt(!) the LVDS cable
  connecting the graphics card to the monitor. I will getting around to
  replacing that cable any day now. <a href="#fnref:1" class="reversefootnote" role="doc-backlink">&#8617;</a></p>
    </li>
    <li id="fn:2" role="doc-endnote">
      <p>Never going to use it, probably. <a href="#fnref:2" class="reversefootnote" role="doc-backlink">&#8617;</a></p>
    </li>
    <li id="fn:3" role="doc-endnote">
      <p>Some of these may be 3.1, because one of the USB controllers is an “ASMedia
  Technology Inc. ASM1142 USB 3.1” controller. <a href="#fnref:3" class="reversefootnote" role="doc-backlink">&#8617;</a></p>
    </li>
    <li id="fn:4" role="doc-endnote">
      <p>My laptop is 4.5kgs. Looks like my computers all turn out to be
  heavyweights. <a href="#fnref:4" class="reversefootnote" role="doc-backlink">&#8617;</a></p>
    </li>
  </ol>
</div>]]></content><author><name></name></author><category term="tech" /><category term="linux" /><summary type="html"><![CDATA[It’s been 4½ years since I bought my System76 laptop, and it is showing its age. Back in 2013, an NVIDIA GT670 MX was a pretty decent laptop graphics card (which meant it couldn’t hold a candle to the desktop graphics cards). But I was able to play Hitman: Absolution, the various Mass Effect games, Tomb Raider and so on on it, and with OK graphics levels and resolutions. Fast forward to 2017, and we have HITMAN, Mass Effect: Andromeda, Assassin’s Creed: Origins, and the 670MX really struggled with them (I don’t have Origins, but it struggled with Unity). And so I decided to upgrade. After casting my net far and wide, I decided against going for a laptop again. My current laptop is functioning pretty much as a desktop1, so I might as well get another desktop. Not because of battery issues, but because I burnt(!) the LVDS cable &#8617;]]></summary></entry><entry><title type="html">Signing off from IITB</title><link href="https://muru.dev/2016/09/23/iitb-bye.html" rel="alternate" type="text/html" title="Signing off from IITB" /><published>2016-09-23T00:00:00+00:00</published><updated>2016-09-23T00:00:00+00:00</updated><id>https://muru.dev/2016/09/23/iitb-bye</id><content type="html" xml:base="https://muru.dev/2016/09/23/iitb-bye.html"><![CDATA[<p>So, after all this time, I’m finally bidding good bye to IITB. I finished my
MTP work on July 4, got my degree on August 13, but it is today that I feel I’m
finally leaving this place. In three days I will be moving to Tokyo and that
separation has a finality to it that my brief stay in Pune didn’t — after
all, if I wanted, I could reach the campus in about 6 hours from Pune. :laughing:</p>

<!-- section -->

<p>Whenever someone asks, I usually say I preferred IITG to IITB (and I guess, 
as my <em>alma mater</em>, it will always be №1 for me). However, in many ways, my
time IITB was richer.<sup id="fnref:1" role="doc-noteref"><a href="#fn:1" class="footnote" rel="footnote">1</a></sup> I feel like I <em>experienced</em> more here, that the highs
were higher and the lows deeper, but that could simply be the effect of a slight
increase in senility. IITB also felt a lot more like <em>home</em>, probably because
home itself is so close. Like the moon giving a pale reflection of the sun, the
campus had a comfort, reflecting the comfort I felt at home. It helped that most
of my time here was spent doing things I enjoyed (<em>cough</em> not Mechanical
Engineering <em>cough</em> :grin:).</p>

<p>So what did I do on my last morning here? I climbed a hill, of course.
:stuck_out_tongue: It was an endeavour I’d been putting off for nearly year;
time ran out and now my hand was forced. The last time I was there, I got a few
delightful pics of the black kites that frequent the campus. And since these
birds didn’t seem to mind the rain in July and August, I hoped to see a few of
them today, since a sunrise seemed hopeless. Well, not one turned up. I barely
heard the echo of a kite’s scream today. :unamused: It was a very humid, very wet
morning, and I didn’t get much to photograph.</p>

<p>In a way, the trip reflected both what I wanted from time at IITB, and what it
actually was. I wanted to set goals, put in the effort and achieve those goals.
Instead, I spent most of time coasting, leaving me with regrets and missed
opportunities. And much like the trip up the hill, I’m not sure my time here was
all that fruitful — I leave here with the distinct impression that I
haven’t achieved what I came here to do.</p>

<!-- section -->

<p>A few pics to cheer up a depressing post<sup id="fnref:2" role="doc-noteref"><a href="#fn:2" class="footnote" rel="footnote">2</a></sup>: :smile:</p>

<div class="slideshow-wrap">
<a data-flickr-embed="true" href="https://www.flickr.com/photos/murukesh_m/albums/72157674252507715" title="Bye IITB!"><img src="https://c5.staticflickr.com/9/8127/29573208060_e001b4a7cb_z.jpg" width="640" height="427" alt="Bye IITB!" /></a><script async="" src="//embedr.flickr.com/assets/client-code.js" charset="utf-8"></script></div>

<!-- section -->

<div class="footnotes" role="doc-endnotes">
  <ol>
    <li id="fn:1" role="doc-endnote">
      <p>Well, I was paid a stipend here, of course. :stuck_out_tongue: <a href="#fnref:1" class="reversefootnote" role="doc-backlink">&#8617;</a></p>
    </li>
    <li id="fn:2" role="doc-endnote">
      <p>Thanks to Flickr for the suprisingly simple album embedding option! Google Photos has a ways to go yet. <a href="#fnref:2" class="reversefootnote" role="doc-backlink">&#8617;</a></p>
    </li>
  </ol>
</div>]]></content><author><name></name></author><category term="life" /><summary type="html"><![CDATA[So, after all this time, I'm finally bidding good bye to IITB.]]></summary></entry><entry><title type="html">Enabling HTTPS</title><link href="https://muru.dev/2016/05/29/ssl.html" rel="alternate" type="text/html" title="Enabling HTTPS" /><published>2016-05-29T00:00:00+00:00</published><updated>2016-05-29T00:00:00+00:00</updated><id>https://muru.dev/2016/05/29/ssl</id><content type="html" xml:base="https://muru.dev/2016/05/29/ssl.html"><![CDATA[<p>So, it’s been around a year and a half since I set up this site. At the time I
shifted to Github pages and got a custom domain, I had thought about setting up
HTTPS. For several reasons, I’m a proponent of an HTTPS-only web. Where I can, I
try to make it so.</p>

<p>For example, the main IITB CSE website (<a href="http://www.cse.iitb.ac.in">http://www.cse.iitb.ac.in</a>) is
HTTPS-only, however this is only enforced for the department website. User pages
and parts of the site proxied to other servers aren’t HTTPS-only, much as I’d
like them to be. I had initially tried enforcing HTTPS for the entire site, but
it broke some old pages that the users were unwilling or unable to fix.</p>

<p>Of course, it’d be hypocritical of me to not offer or enforce HTTPS on my own
site. That, however, is difficult to do. Github Pages didn’t support HTTPS at
all earlier. (Now it does, albeit unofficially.) It still has no option to
support HTTPS for custom domains.</p>

<!-- section -->

<p>Recently, two things happened:</p>

<ol>
  <li>I had occasion to visit a friend’s website, and he had HTTPS setup and
enforced.</li>
  <li>Gitlab started offering their own <a href="https://about.gitlab.com/2016/04/07/gitlab-pages-setup/">Gitlab Pages</a> service, which
did support HTTPS for their Pages domains from the start.</li>
</ol>

<p>Ever since I installed Gitlab for <a href="https://git.cse.iitb.ac.in">the CSE Git server</a>, I’ve been a fan
of their work. Their monthly release schedule meant that bugs were fixed and
features added regularly. Integration of a CI implementation and
<a href="https://www.mattermost.org/">Mattermost</a> was a plus. So, when Gitlab Pages was announced, I was
interested. It supported more Static Site Generators (SSGs) than did Github
(which only supported a crippled Jekyll). You could use practically any Jekyll
plugin you wanted, since the command to generate the site was specified by you
as CI configuration. I didn’t see much reason to migrate at the time, since I’d
have to add CI configuration, and there seemed to be not much benefit with
having my page available from four (!) places (#visitors ≤ #sites
:stuck_out_tongue:).</p>

<p>Seeing the friend’s site gave me impetus to investigate my options for HTTPS
once again. This time, there seemed to be some updates:</p>

<ol>
  <li>Using CloudFlare to provide HTTPS is a commonly-suggested method.</li>
  <li>Other options offering a similar workaround have come up, like
<a href="https://kloudsec.com/github-pages/new">Kloudsec</a>.</li>
  <li><a href="https://letsencrypt.org/getting-started/">Let’s Encrypt</a> has taken wing.</li>
  <li>And finally, Gitlab Pages started supporting custom domains <strong>with HTTPS</strong>.</li>
</ol>

<!-- section -->

<p>First, I tried the CloudFlare way. That was fairly easy, following <a href="https://developer.ubuntu.com/en/blog/2016/02/17/how-host-your-static-site-https-github-pages-and-cloudflare/">this blog
post</a>. Register with CloudFlare, add your domains, switch
nameservers with the ones provided by them, and then start toggling the options.
Of interest:</p>

<ol>
  <li>You have to enable both DNS+proxy with CF for HTTPS, HTTPS redirection and
HSTS to take effect.</li>
  <li>The <em>Full (Strict)</em> option is what you need to make CF use HTTPS with the
actual server <em>and</em> check certificate validity. This won’t work with Github
Pages.</li>
  <li>As usual, changing nameservers takes a while. So, for immediate testing, I
added the CF nameservers to <code class="language-plaintext highlighter-rouge">/etc/resolv.conf</code>. (And looked up the IPs for
use in <code class="language-plaintext highlighter-rouge">/etc/hosts</code>, just in case.)</li>
</ol>

<p>The annoying bit is that the Github Pages site, which redirects to my custom
domain, still prefers HTTP. So: <code class="language-plaintext highlighter-rouge">https://murukeshm.github.io</code> →
<code class="language-plaintext highlighter-rouge">http://murukesh.me</code> → <code class="language-plaintext highlighter-rouge">https://murukesh.me</code>. :unamused: And if you do enable
<code class="language-plaintext highlighter-rouge">Full (Strict)</code> SSL, down goes your site.</p>

<!-- section -->

<p>And so the hunt continued. Like I said, Gitlab Pages had started some time ago,
but I didn’t know that it support custom domains with HTTPS support. I learnt
about that while browsing <a href="https://github.com/isaacs/github/issues/156">the Github issue</a> about HTTPS support on Pages,
from @konkone’s <a href="https://github.com/isaacs/github/issues/156#issuecomment-206421767">comment</a>.</p>

<p>So, off I went to Gitlab.com, where I already had an account I made for
participating in Gitlab CE issues. I imported the repository from Github,
renamed it, and added a <code class="language-plaintext highlighter-rouge">.gitlab-ci.yml</code> to kickstart the Gitlab CI’s page
building process. I lifted the contents from <a href="https://gitlab.com/jekyll-themes/default-bundler">the default Jekyll setup for
Gitlab</a>. The build started, and took a couple of minutes to
finish. That’s not a big deal, since updates to Github Pages may take upto 5
minutes, and with Gitlab, you can see the status of the build, and the live log
output as well. In particular, the latter is very useful to spot bugs.</p>

<p>Now came the most tiresome part: actually getting a certificate for
<code class="language-plaintext highlighter-rouge">murukesh.me</code>. There are a few options for getting a free certificate. I decided
to try <em>Let’s Encrypt</em> (instead of StartSSL, just for the sake of it). So, I
installed the <code class="language-plaintext highlighter-rouge">letsencrypt</code> package on my Arch Linux system, and ran the tool.
And, well, apparently by default it’s designed to run <em>on the server hosting
the site</em> you want to encrypt. :neutral_face: You have to pick the <code class="language-plaintext highlighter-rouge">manual</code>
option, and this, I discovered too late, is already well-described in <a href="https://about.gitlab.com/2016/04/11/tutorial-securing-your-gitlab-pages-with-tls-and-letsencrypt/">Gitlab’s
tutorial on using <em>Let’s Encrypt</em></a>.</p>

<p>It’s still cumbersome though:</p>

<ol>
  <li>You have to add the domains on Gitlab without the certificates.</li>
  <li>When you run the <code class="language-plaintext highlighter-rouge">letsencrypt</code> tool, it generates some text you have to add
to your site. Annoyingly, it does so once each for each domain listed, and it
waits for each addition to finish. So, two domains, two commits.</li>
  <li>Then, after LE has generated the certificates, you have to remove and add
back the domains on Gitlab, since it doesn’t support editing an added domain
to add a certificate. :tired_face:</li>
</ol>

<!-- section -->

<p>After all that, I do have HTTPS on both <code class="language-plaintext highlighter-rouge">murukesh.me</code> and <code class="language-plaintext highlighter-rouge">murukesh.gitlab.io</code>.
(Side note: Yay for getting in early enough to get <code class="language-plaintext highlighter-rouge">murukesh</code> as my ID!)
However, Gitlab still doesn’t support redirection of HTTP to HTTPS. So, I’m back
to using CloudFlare to add HTTP-to-HTTPS redirection and HSTS for my site.</p>

<p>There’s also the problem of renewing the <em>Let’s Encrypt</em> certificate, which
lasts around three months. Apparently <a href="https://gitlab.com/gitlab-org/gitlab-ee/issues/474">there are plans</a> to
integrate LE with Gitlab Pages to automate the whole shebang. There’s also a
recent <a href="https://gitlab.com/gitlab-com/support-forum/issues/721">feature request</a> to enable redirection of HTTP to HTTPS.</p>

<p>Here’s to hoping both of them getting implemented!</p>

<!-- section -->

<h1 id="update-june-13-2016">Update (June 13, 2016)</h1>

<p>On June 8, Github announced <a href="https://github.com/blog/2186-https-for-github-pages">official support for HTTPS</a> on their
user pages. Not only are <code class="language-plaintext highlighter-rouge">*.github.io</code> pages available on HTTPS like
<code class="language-plaintext highlighter-rouge">*.gitlab.io</code> ones, you can also force them to be HTTPS-only, as long as <em>you
don’t use a custom domain</em>. That means I’ll probably have to remove the <code class="language-plaintext highlighter-rouge">CNAME</code>
file from the repo. Your move, Gitlab!</p>]]></content><author><name></name></author><category term="config" /><category term="tech" /><summary type="html"><![CDATA[So, it’s been around a year and a half since I set up this site. At the time I shifted to Github pages and got a custom domain, I had thought about setting up HTTPS. For several reasons, I’m a proponent of an HTTPS-only web. Where I can, I try to make it so.]]></summary></entry><entry><title type="html">Yet another Jekyll post</title><link href="https://muru.dev/2015/09/06/jekyll.html" rel="alternate" type="text/html" title="Yet another Jekyll post" /><published>2015-09-06T00:00:00+00:00</published><updated>2015-09-06T00:00:00+00:00</updated><id>https://muru.dev/2015/09/06/jekyll</id><content type="html" xml:base="https://muru.dev/2015/09/06/jekyll.html"><![CDATA[<p>I shifted my personal site to Jekyll some time ago, but I hadn’t yet fully
embraced it. Now that I’d decided to blog again, I set about using Jekyll to see
if it could provide support for the blogger Hyde in me. (Yes, yes, that was
terrible.)</p>

<p>I needed to set it up so that the site would work across the three ways it can
be accessed:</p>

<ul>
  <li><a href="https://murukeshm.github.io">Github Pages</a></li>
  <li><a href="https://murukesh.me">Personal domain</a></li>
  <li><a href="https://www.cse.iitb.ac.in/~murukesh">CSE homepage</a></li>
</ul>

<p>Github Pages, while decidedly convenient for starting out, is not so convenient
when it comes to expanding. Not that Jekyll is all that convenient either.</p>

<ol>
  <li>You cannot easily publish your blog posts under a subdirectory</li>
  <li>Posts cannot have a counter-based ID. The permalink can only be based on the
date and title.</li>
  <li>You have to rely on external providers for comment support. Maybe Disqus, or
Facebook, or something else.</li>
</ol>

<p>But…</p>

<ol>
  <li>Markdown is fun to write in. It is clear, logical and the source is easy to
read.</li>
  <li>Jekyll seems to do a good job of templating, without too much boilerplate.</li>
  <li>Having things like code highlighting taken care of is quite convenient.</li>
</ol>

<p>Setting up Jekyll is quite easy - the site has good instructions. I’ll just
focus on things I had trouble doing.</p>

<!-- section -->

<h1 id="page-permalinks">Page permalinks</h1>

<p>On Github, pages could be accessed both with and without an extension (<code class="language-plaintext highlighter-rouge">/index</code>
and <code class="language-plaintext highlighter-rouge">/index.html</code> both worked fine). Naturally, I stuck to the extension-less
form. Running Jekyll locally, I ran into trouble - it did not support
extension-less access. I’d guess this is presumably because the Github Pages
setup has something like this (in terms of <code class="language-plaintext highlighter-rouge">nginx</code> config):</p>

<div class="language-plaintext highlighter-rouge"><div class="highlight"><pre class="highlight"><code>try_files $uri $uri.html ...;
</code></pre></div></div>

<p>Annoyed, I resorted to specifying the permalinks manually. After all, I did only
have four pages - the rest generated as posts. And <code class="language-plaintext highlighter-rouge">index.md</code> didn’t need any
help, so the mess is down to three pages.</p>

<!-- section -->

<h1 id="code-highlighting">Code Highlighting</h1>

<p>Displaying code proved to be a tricky thing. I’m software guy, naturally my post
will include bits of code here and there. I want it to be pretty (syntax
highlighting, line numbers, the works). Jekyll offers two ways for prettifying
code: <a href="http://pygments.org/">Pygments</a> and <a href="https://github.com/jneen/rouge">Rouge</a>. Pygments is written in Python, and Rouge in Ruby.
So, naturally, you might think Rouge is the way to go, since the whole damned
thing will be in Ruby. Nope.</p>

<p>The thing is, sticking to what Github Pages offers really does constrain you.
And Pages doesn’t support Rouge. So, Pygments is the way to go, and is the
default.</p>

<p>The first time I tried it out, the result was some consternation. You see, back
when I first made this site for the CS699 course, I’d set <code class="language-plaintext highlighter-rouge">display: block</code> for
<code class="language-plaintext highlighter-rouge">span</code> tags. And Pygments relies heavily on <code class="language-plaintext highlighter-rouge">span</code> tags with CSS classes for
Highlighting. So, where I’d hoped to see something like:</p>

<p><img src="/images/jekyll/proper.png" alt="vim-code-proper" /></p>

<p>I got (without the colours):</p>

<p><img src="/images/jekyll/span.png" alt="vim-span-block" /></p>

<p>Flabbergasted, I decided to try out Rouge, and it seemed to work fine, except I
had barely any highlighting - the output was marked up, but I didn’t have
corresponding CSS. The docs suggested picking up a sample <code class="language-plaintext highlighter-rouge">syntax.css</code> which is
purportedly close to Github’s own style. Ah… But I wanted a dark theme, and I
wasn’t too fond of Github’s theme as it is. After a bit of going around in
circles, I realised Rouge wasn’t supported by Github, and so I went back to
Pygments. A quick inspection showed me what the problem was, and just as quickly
I deleted the offending CSS rule. I had no idea why it was around, since I used
barely any <code class="language-plaintext highlighter-rouge">span</code> blocks - at least, I couldn’t see any visible effect on the
site! With that problem solved, two remained: the colour theme conundrum, and
line numbers.</p>

<aside>
  <p>I could have gone the JavaScript way, but I wanted to see how much I could
accomplish server-side. I’d looked at a couple of code highlighting JavaScript
libraries back in the day, and I vaguely recall deciding them to be not worth
the effort. Plus, Pygments and Rouge both supported VimScript (or VimL, as you
may prefer to call it), whereas whatever library Stack Exchange used didn’t
(it’s <a href="https://github.com/google/code-prettify">Google Code Prettify</a>).</p>
</aside>

<p>Like with Rouge, the next problem was CSS. Thankfully, the step to get a CSS
file for Pygments was easy:</p>

<div class="language-plaintext highlighter-rouge"><div class="highlight"><pre class="highlight"><code>pygmentize -S &lt;theme&gt; -f html &gt; foo.css
</code></pre></div></div>

<p>After a few trials, I chose the <code class="language-plaintext highlighter-rouge">normal</code> theme.</p>

<p>Line numbering was harder. Oh, both could do numbering, but the numbers would be
selected too when you selected the code, and worse, copied. Apparently, Pygments
supported a <code class="language-plaintext highlighter-rouge">table</code> option to <code class="language-plaintext highlighter-rouge">linenos</code>, but it looked weird. There was <a href="proper-line-numbers">a
delightful solution</a> that involved using <code class="language-plaintext highlighter-rouge">lineanchors</code>
instead of <code class="language-plaintext highlighter-rouge">linenos</code>, and then applying a CSS counter to create the numbers.
Unfortunately, <code class="language-plaintext highlighter-rouge">lineanchors</code> doesn’t work when Jekyll runs in <code class="language-plaintext highlighter-rouge">safe</code> mode, which
it does on Github. Then I applied the same technique to <code class="language-plaintext highlighter-rouge">linenos</code>, and hid the
numbers generated by Pygments :mask::</p>

<figure class="highlight"><pre><code class="language-css" data-lang="css"><table class="rouge-table"><tbody><tr><td class="gutter gl"><pre class="lineno">1
2
3
4
5
6
7
8
9
10
11
12
13
14
15
16
17
18
19
20
21
22
23
24
</pre></td><td class="code"><pre><span class="nt">pre</span> <span class="p">{</span>
    <span class="nl">counter-reset</span><span class="p">:</span> <span class="n">line-numbering</span><span class="p">;</span>
<span class="p">}</span>

<span class="nt">pre</span> <span class="nt">span</span><span class="nc">.lineno</span><span class="nd">::after</span> <span class="p">{</span>
	<span class="nl">content</span><span class="p">:</span> <span class="n">counter</span><span class="p">(</span><span class="n">line-numbering</span><span class="p">,</span> <span class="nb">decimal-leading-zero</span><span class="p">);</span>
	<span class="nl">counter-increment</span><span class="p">:</span> <span class="n">line-numbering</span><span class="p">;</span>
	<span class="nl">opacity</span><span class="p">:</span> <span class="m">0.4</span><span class="p">;</span>
	<span class="nl">-webkit-touch-callout</span><span class="p">:</span> <span class="nb">none</span><span class="p">;</span>
	<span class="nl">-webkit-user-select</span><span class="p">:</span> <span class="nb">none</span><span class="p">;</span>
	<span class="nl">-khtml-user-select</span><span class="p">:</span> <span class="nb">none</span><span class="p">;</span>
	<span class="nl">-moz-user-select</span><span class="p">:</span> <span class="nb">none</span><span class="p">;</span>
	<span class="nl">-ms-user-select</span><span class="p">:</span> <span class="nb">none</span><span class="p">;</span>
	<span class="py">user-select</span><span class="p">:</span> <span class="nb">none</span><span class="p">;</span>
	<span class="nl">visibility</span><span class="p">:</span> <span class="nb">visible</span><span class="p">;</span>
	<span class="nl">margin-left</span><span class="p">:</span> <span class="m">-1em</span><span class="p">;</span>
<span class="p">}</span>

<span class="nt">pre</span> <span class="nt">span</span><span class="nc">.lineno</span> <span class="p">{</span>
	<span class="nl">visibility</span><span class="p">:</span> <span class="nb">collapse</span><span class="p">;</span>
	<span class="nl">text-align</span><span class="p">:</span> <span class="nb">right</span><span class="p">;</span>
	<span class="nl">display</span><span class="p">:</span> <span class="n">inline-block</span><span class="p">;</span>
	<span class="nl">min-width</span><span class="p">:</span> <span class="m">1em</span><span class="p">;</span>
<span class="p">}</span>
</pre></td></tr></tbody></table></code></pre></figure>

<!-- section -->

<h1 id="sectioning">Sectioning</h1>

<p>By default, the entire post content is stuffed into the <code class="language-plaintext highlighter-rouge">content</code> Liquid
variable. If you want to split your post into sections, tough luck. This
<a href="http://stackoverflow.com/q/26395044/2072269">StackOverflow post</a> helped me out.
One of the answers talks about the <code class="language-plaintext highlighter-rouge">post.excerpt</code> feature, where you can use an
<code class="language-plaintext highlighter-rouge">excerpt_separator</code> to demarcate out the post blurb, in case you want something
different from the default. Turns out, the idea can be easily extended to a
generic separator. For example, add to your <code class="language-plaintext highlighter-rouge">_content.yaml</code>:</p>

<div class="language-yaml highlighter-rouge"><div class="highlight"><pre class="highlight"><code><span class="na">section_separator</span><span class="pi">:</span> <span class="s2">"</span><span class="s">&lt;!--</span><span class="nv"> </span><span class="s">section</span><span class="nv"> </span><span class="s">--&gt;"</span>
</code></pre></div></div>

<p>And create a new layout (say <code class="language-plaintext highlighter-rouge">_layouts/sectioned_posts.html</code>) containing (aside
from the boilerplate):</p>

<figure class="highlight"><pre><code class="language-liquid" data-lang="liquid"><table class="rouge-table"><tbody><tr><td class="gutter gl"><pre class="lineno">1
2
3
4
5
6
</pre></td><td class="code"><pre><span class="p">{%</span><span class="w"> </span><span class="nt">assign</span><span class="w"> </span><span class="nv">sections</span><span class="w"> </span><span class="o">=</span><span class="w"> </span><span class="nv">content</span><span class="w"> </span><span class="p">|</span><span class="w"> </span><span class="nf">split</span><span class="p">:</span><span class="w"> </span><span class="nv">site</span><span class="p">.</span><span class="nv">section_separator</span><span class="w"> </span><span class="p">%}</span>
<span class="p">{%</span><span class="w"> </span><span class="nt">for</span><span class="w"> </span><span class="nv">section</span><span class="w"> </span><span class="nt">in</span><span class="w"> </span><span class="nv">sections</span><span class="w"> </span><span class="p">%}</span>
&lt;section&gt;
<span class="p">{{</span><span class="w"> </span><span class="nv">section</span><span class="w"> </span><span class="p">}}</span>
&lt;/section&gt;
<span class="p">{%</span><span class="w"> </span><span class="nt">endfor</span><span class="w"> </span><span class="p">%}</span>
</pre></td></tr></tbody></table></code></pre></figure>

<p>Your source will look like:</p>

<figure class="highlight"><pre><code class="language-html" data-lang="html"><table class="rouge-table"><tbody><tr><td class="gutter gl"><pre class="lineno">1
2
3
4
5
6
7
8
9
10
11
12
</pre></td><td class="code"><pre>Call me Muru.

<span class="c">&lt;!-- section --&gt;</span>

I am an aspiring BOFH. Often called a psycho. Now in my third year of the Master
of Technology in Computer Science and Engineering course in IIT Bombay, and
working for the department as an RA in System Administration, I get plenty of
opportunity to hone my skills. :)

<span class="c">&lt;!-- section --&gt;</span>

I share the hobby of the masses - reading. :P
</pre></td></tr></tbody></table></code></pre></figure>

<p>See my <a href="/">front page</a> for the output. :)</p>

<!-- section -->

<h1 id="comments">Comments</h1>

<p>The last thorny issue was comments. I wanted to enable comments, even if the
site had tumbleweeds rolling around. Given the static nature of the site,
storing comments here was out of the question. That left me with external
providers.</p>

<p>I tried <a href="https://browsingthenet.blogspot.in/2013/04/google-plus-comments-on-any-website.html">Google+ comments</a>, but text area never loaded
properly. Using <a href="http://ivanzuzak.info/2011/02/18/github-hosted-comments-for-github-hosted-blogs.html">Github issues</a> seems to be a nice idea, but I’m too lazy to
follow through on it. I tried <a href="https://developers.facebook.com/docs/plugins/comments">Facebook comments</a> but an odd issue
popped up: when I clicked on the text box on my phone, the orientation was
forced to landscape, even though the device hadn’t rotated. So, I ditched it and
went to <a href="https://disqus.com/admin/universalcode">Disqus</a>. After styling it nicely, I opened my phone to test … and ran
into the same problem. Soon after posting on the Disqus forums, I found the
problem: <a href="http://stackoverflow.com/q/8883163/2072269">Android silliness</a>. The soft keyboard eats in to the page display area,
thus changing the height and hence the orientation.</p>

<p>I wanted to consider both the height and width, so the accepted answer (using
<code class="language-plaintext highlighter-rouge">max-width</code>) was not acceptable to me. The next-best solution used boundary
values for <code class="language-plaintext highlighter-rouge">aspect-ratio</code> different from <code class="language-plaintext highlighter-rouge">1/1</code>. After some more digging around,
I decided to use <a href="http://stackoverflow.com/a/32421098/2072269"><code class="language-plaintext highlighter-rouge">device-aspect-ratio</code> instead</a>.</p>]]></content><author><name></name></author><category term="jekyll" /><category term="config" /><summary type="html"><![CDATA[I shifted my personal site to Jekyll some time ago, but I hadn’t yet fully embraced it. Now that I’d decided to blog again, I set about using Jekyll to see if it could provide support for the blogger Hyde in me. (Yes, yes, that was terrible.)]]></summary></entry><entry><title type="html">Vim as $MANPAGER</title><link href="https://muru.dev/2015/08/28/vim-for-man.html" rel="alternate" type="text/html" title="Vim as $MANPAGER" /><published>2015-08-28T00:00:00+00:00</published><updated>2015-08-28T00:00:00+00:00</updated><id>https://muru.dev/2015/08/28/vim-for-man</id><content type="html" xml:base="https://muru.dev/2015/08/28/vim-for-man.html"><![CDATA[<p>Long, long ago, in a hostel room far, far away, I once read about using Vim as
the pager for <code class="language-plaintext highlighter-rouge">man</code>. It involved using some script which made <code class="language-plaintext highlighter-rouge">vim</code> behave like
<code class="language-plaintext highlighter-rouge">less</code> (or something like that). I’d stumbled upon it while trying to make
reading manpages more comfortable, with syntax colouring, navigation, etc.</p>

<p>Of late, with <a href="http://vi.stackexchange.com">Vim.SE</a> for support, I’ve been customizing Vim more and more.
I’ve made a Git repo of my Vim files, taken baby steps in automating tasks I
often do, and so on. While looking through the recent posts in <a href="http://unix.stackexchange.com">Unix.SE</a>, I came
across <a href="http://unix.stackexchange.com/a/1853/70524">this post</a> which suggested using your editor as the pager. That
kicked up the dusty cobwebs in my decrepit memory module, and I remembered that
old attempt at using Vim for reading manpages. So, I set about trying to make
Vim <code class="language-plaintext highlighter-rouge">man</code>’s pager. Why did I submit myself to such cruel and unusual punishment?</p>

<ol>
  <li>I <em>like</em> Vim.</li>
  <li>I have it customized to my liking.</li>
  <li>It is powerful. The search is way better than anything <code class="language-plaintext highlighter-rouge">less</code> or your average
manpage browser (like <code class="language-plaintext highlighter-rouge">yelp</code>) can offer.</li>
  <li>It can browse to other manpages mentioned using tag navigation (<code class="language-plaintext highlighter-rouge">&lt;c-]&gt;</code>,
<code class="language-plaintext highlighter-rouge">&lt;c-t&gt;</code>).</li>
</ol>

<p>The post suggested setting <code class="language-plaintext highlighter-rouge">$MANPAGER</code> to a combination of <code class="language-plaintext highlighter-rouge">col</code> and <code class="language-plaintext highlighter-rouge">vim</code>:</p>

<div class="language-sh highlighter-rouge"><div class="highlight"><pre class="highlight"><code><span class="nb">export </span><span class="nv">MANPAGER</span><span class="o">=</span><span class="s2">"col -b | vim -c 'set ft=man nomod nolist ignorecase' -"</span>
</code></pre></div></div>

<p>For decidedly non-obvious reasons, it’s not likely to work for you. Why?
Because GNU <code class="language-plaintext highlighter-rouge">man</code> doesn’t support piped commands in <code class="language-plaintext highlighter-rouge">$MANPAGER</code> – BSD’s <code class="language-plaintext highlighter-rouge">man</code>
does (that’s +1 for you OSX folks). From <a href="http://man7.org/linux/man-pages/man1/man.1.html"><code class="language-plaintext highlighter-rouge">man man</code></a>:</p>

<pre><code>MANPAGER, PAGER
   If $MANPAGER or $PAGER is set ($MANPAGER is used in preference),
   its value is used as the name of the program used to display the
   manual page.  By default, pager -s is used.

   The  value  may  be  a  simple  command  name  or a command with
   arguments,  and  may  use  shell  quoting  (backslashes,  single
   quotes,  or  double  quotes).   <strong>It  may not use pipes to connect
   multiple commands</strong>; if you need that, use a wrapper script, which
   may  take  the  file  to  display  either  as  an argument or on
   standard input.
</code></pre>

<p>I tried the suggested solution (using a wrapper script), which worked fine.
However, it created a problem: I use Git to manage my dotfiles. I’d rather <em>not</em>
rely on stuff outside the repo. Stuff installed by package managers and
differences per distro are a fact of life and have to be handled, but I’d rather
not take pains over what I add to it. One obvious solution is to wrap the
command in <code class="language-plaintext highlighter-rouge">sh -c</code>:</p>

<div class="language-sh highlighter-rouge"><div class="highlight"><pre class="highlight"><code><span class="nv">MANPAGER</span><span class="o">=</span><span class="s1">'sh -c "col -b | vim -c \'</span><span class="nb">set </span><span class="nv">ft</span><span class="o">=</span>man nomod nolist ignorecase<span class="se">\'</span> -<span class="s2">"'
</span></code></pre></div></div>

<p><strong>Ugly.</strong> I also hate having to deal with quoting.</p>

<!-- section -->

<p>At this point, it struck me: Why should I run this via a pipe? Once Vim starts,
I can perfectly well use <code class="language-plaintext highlighter-rouge">%! col -b</code> to do the job. So:</p>

<div class="language-sh highlighter-rouge"><div class="highlight"><pre class="highlight"><code><span class="nv">MANPAGER</span><span class="o">=</span><span class="s1">'vim -c "%! col -b" -c "set ft=man nomod nolist ignorecase" -'</span>
</code></pre></div></div>
<p>Nice!</p>

<p>Now, other considerations started popping up. You can easily quite <code class="language-plaintext highlighter-rouge">less</code> (and
by extension, <code class="language-plaintext highlighter-rouge">man</code>), by pressing <kbd>q</kbd>, or <kbd>Ctrl</kbd><kbd>C</kbd>.
Vim usually considers a buffer read from <code class="language-plaintext highlighter-rouge">stdin</code> to be modified. Therefore, to
quit a manpage, you’d have to do <code class="language-plaintext highlighter-rouge">:q!</code>, not just <code class="language-plaintext highlighter-rouge">:q</code>. Thankfully, one of the
options set (<a href="https://vimhelp.appspot.com/options.txt.html#%27nomod%27"><code class="language-plaintext highlighter-rouge">nomod</code></a>) tells Vim that the buffer hasn’t been modified.
Therefore, we can just use <code class="language-plaintext highlighter-rouge">:q</code>:</p>

<div class="language-vim highlighter-rouge"><div class="highlight"><pre class="highlight"><code>nnoremap <span class="k">q</span> <span class="p">:</span><span class="k">q</span><span class="p">&lt;</span>CR<span class="p">&gt;</span>
</code></pre></div></div>

<p>Other considerations arise:</p>

<ul>
  <li>The buffer is modifiable. There’s no reason for it to be so.</li>
  <li>The buffer doesn’t have a name. It would be convenient to see the name of the
manpage.</li>
  <li>You don’t want swapfiles hanging around from manpages.</li>
</ul>

<p>As I pondered over this, I realised that these are settings I’d want to apply to
a manpage no matter how I opened it. Hence, they should really be in Vim’s
filetype settings for <code class="language-plaintext highlighter-rouge">man</code>. So, I created a <code class="language-plaintext highlighter-rouge">~/.vim/ftplugin/man.vim</code>,
containing:</p>

<figure class="highlight"><pre><code class="language-vim" data-lang="vim"><table class="rouge-table"><tbody><tr><td class="gutter gl"><pre class="lineno">1
2
3
4
5
6
7
8
9
10
11
12
</pre></td><td class="code"><pre><span class="k">function</span><span class="p">!</span> PrepManPager<span class="p">()</span>
	<span class="k">if</span> <span class="p">!</span><span class="nb">empty</span> <span class="p">(</span>$MAN_PN<span class="p">)</span>
		<span class="k">silent</span> %<span class="p">!</span> <span class="k">col</span> <span class="p">-</span><span class="k">b</span>
		<span class="k">file</span> $MAN_PN
	<span class="k">endif</span>
	<span class="k">setlocal</span> <span class="nb">nomodified</span>
	<span class="k">setlocal</span> <span class="nb">nomodifiable</span>
	<span class="k">setlocal</span> <span class="nb">readonly</span>
	<span class="k">setlocal</span> <span class="nb">nolist</span>
	<span class="k">setlocal</span> <span class="k">noswapfile</span>
<span class="k">endfunction</span>
autocmd <span class="nb">VimEnter</span> * PrepMan<span class="p">()</span>
</pre></td></tr></tbody></table></code></pre></figure>

<p>I picked <a href="https://vimhelp.appspot.com/autocmd.txt.html#VimEnter"><code class="language-plaintext highlighter-rouge">VimEnter</code></a> since it runs after any commands specified using
<code class="language-plaintext highlighter-rouge">-c</code> are run, so I can get it to run after the filetype has been set.</p>

<p>However, I realised that:</p>

<ul>
  <li>I wanted to apply some of these settings to manpages irrespective of how they
were opened; and</li>
  <li>I’d rather not specify <code class="language-plaintext highlighter-rouge">set ft=man</code> from the command line, keeping an eye on
using Vim as a general-purpose pager;</li>
  <li>Using <code class="language-plaintext highlighter-rouge">VimEnter *</code> felt <em>wrong</em>.</li>
</ul>

<p>A bit of experimentation later, I found that:</p>

<ol>
  <li><code class="language-plaintext highlighter-rouge">man</code> doesn’t seem to ever provide a filename as an argument, irrespective of
what the manpage says.</li>
  <li><code class="language-plaintext highlighter-rouge">man</code> sets <code class="language-plaintext highlighter-rouge">MAN_PN</code> to the manpage name (<code class="language-plaintext highlighter-rouge">man(1)</code>, for example)</li>
</ol>

<aside>
  <p>Git does something similar. When opening logs via <code class="language-plaintext highlighter-rouge">PAGER='vim -' git log</code>, for
example, you’ll find that an environment variable name <code class="language-plaintext highlighter-rouge">GIT_PREFIX</code> exists
(though, oddly enough, possibly empty).</p>
</aside>

<!-- section -->

<p>Knowing that I’m reading from <code class="language-plaintext highlighter-rouge">stdin</code> and that <code class="language-plaintext highlighter-rouge">MAN_PN</code> is set (to the manpage
name!), I came up with this version:</p>

<figure class="highlight"><pre><code class="language-vim" data-lang="vim"><table class="rouge-table"><tbody><tr><td class="gutter gl"><pre class="lineno">1
2
3
4
5
6
7
8
9
10
11
12
13
14
15
16
17
18
19
20
21
22
23
24
25
26
</pre></td><td class="code"><pre><span class="c">" vimrc</span>
<span class="k">if</span> <span class="p">!</span><span class="nb">empty</span><span class="p">(</span>$MAN_PN<span class="p">)</span>
	autocmd <span class="nb">StdinReadPost</span> * <span class="k">set</span> <span class="nb">ft</span><span class="p">=</span>man <span class="p">|</span> <span class="k">file</span> $MAN_PN
<span class="k">endif</span>

<span class="c">" ftplugin/man.vim</span>
<span class="k">setlocal</span> <span class="nb">nolist</span>
<span class="k">setlocal</span> <span class="nb">readonly</span>
<span class="k">setlocal</span> <span class="nb">buftype</span><span class="p">=</span>nofile
<span class="k">setlocal</span> <span class="nb">bufhidden</span><span class="p">=</span><span class="k">hide</span>
<span class="k">setlocal</span> <span class="k">noswapfile</span>
<span class="k">setlocal</span> <span class="nb">nomodifiable</span>

<span class="k">function</span><span class="p">!</span> PrepManPager<span class="p">()</span>
	<span class="k">setlocal</span> <span class="nb">modifiable</span>
	<span class="k">if</span> <span class="p">!</span><span class="nb">empty</span> <span class="p">(</span>$MAN_PN<span class="p">)</span>
		<span class="k">silent</span> %<span class="p">!</span> <span class="k">col</span> <span class="p">-</span><span class="k">b</span> <span class="p">-</span><span class="k">x</span>
	<span class="k">endif</span>
	<span class="k">setlocal</span> <span class="nb">nomodified</span>
	<span class="k">setlocal</span> <span class="nb">nomodifiable</span>
<span class="k">endfunction</span>

autocmd <span class="nb">BufWinEnter</span> $MAN_PN <span class="k">call</span> PrepManPager<span class="p">()</span>
nnoremap <span class="k">q</span> <span class="p">:</span><span class="k">qa</span><span class="p">&lt;</span>CR<span class="p">&gt;</span>
nnoremap <span class="p">&lt;</span>Space<span class="p">&gt;</span> <span class="p">&lt;</span>PageDown<span class="p">&gt;</span>
<span class="nb">map</span> <span class="p">&lt;</span>expr<span class="p">&gt;</span> <span class="p">&lt;</span>CR<span class="p">&gt;</span> <span class="nb">winnr</span><span class="p">(</span><span class="s1">'$'</span><span class="p">)</span> <span class="p">==</span> <span class="m">1</span> ? <span class="s1">':vs&lt;CR&gt;&lt;C-]&gt;'</span> <span class="p">:</span> <span class="s1">'&lt;C-]&gt;'</span>
</pre></td></tr></tbody></table></code></pre></figure>

<p>with:</p>

<div class="language-sh highlighter-rouge"><div class="highlight"><pre class="highlight"><code><span class="nb">export </span><span class="nv">MANPAGER</span><span class="o">=</span><span class="s2">"vim -"</span>
</code></pre></div></div>
<p>Beautiful!</p>

<p>What does this do?</p>

<ol>
  <li>In the main <code class="language-plaintext highlighter-rouge">vimrc</code>, I check if I’m reading from <code class="language-plaintext highlighter-rouge">stdin</code> and if <code class="language-plaintext highlighter-rouge">MAN_PN</code> is
set. If so, set the filetype to <code class="language-plaintext highlighter-rouge">man</code> <em>and the filename to the contents of
<code class="language-plaintext highlighter-rouge">MAN_PN</code></em>.</li>
  <li>In the filetype-specific setting, use an <code class="language-plaintext highlighter-rouge">autocmd</code> the relies on the filename
being <code class="language-plaintext highlighter-rouge">$MAN_PN</code> to apply <code class="language-plaintext highlighter-rouge">col -b</code>.</li>
  <li>Set <code class="language-plaintext highlighter-rouge">nomodified</code> to tell Vim that the buffer hasn’t been modified, and
make it a read-only, non-modifiable, scratch buffer.</li>
  <li>Also, map <code class="language-plaintext highlighter-rouge">q</code> to <code class="language-plaintext highlighter-rouge">:qa</code>, so that I can quit all opened manpages, and
<kbd>Space</kbd> to <kbd>Page&nbsp;Down</kbd>, in keeping with the usual behaviour
of <code class="language-plaintext highlighter-rouge">less</code>.</li>
  <li><code class="language-plaintext highlighter-rouge">col -b</code>’s use of tabs led to messed up alignment. I had to use <code class="language-plaintext highlighter-rouge">-x</code> (replace
tabs with spaces) so that, for example, <code class="language-plaintext highlighter-rouge">man ascii</code> showed up properly.</li>
</ol>

<p>Finally, <code class="language-plaintext highlighter-rouge">man man</code> opens up pretty much as I’d like it to.</p>

<p>Why “pretty much”? <code class="language-plaintext highlighter-rouge">man</code> obeys <code class="language-plaintext highlighter-rouge">MANWIDTH</code>, so I can get a manpage formatted
exactly as wide as I want. If open a manpage within Vim, however (by navigating
the tags, for example), the page is formatted for the full width of Vim. :(
Secondly, Vim leaves this annoying message:</p>

<div class="language-plaintext highlighter-rouge"><div class="highlight"><pre class="highlight"><code>$ man man
Vim: Reading from stdin...

$
</code></pre></div></div>

<p>For the moment, I’ve adopted the decidedly un-Vim-like solution of opening a
split before navigating to any tags - half the terminal width is fine for me.
That’s what the last mapping in the above snippet does: check if I have only one
window open, and if so, open a new window before jumping to the tag - with the
added benefit using to the thoroughly intuitive (to me) <kbd>Enter</kbd> key for
jumping to the named page. As a happy side effect, I get to see exactly where I
was in the new window! :)</p>

<p>I have no idea how to suppress the <code class="language-plaintext highlighter-rouge">stdin</code> message from Vim itself.</p>

<hr />
<p>All told:</p>

<p><a href="/images/vim-man.png"><img src="/images/vim-man.png" alt="man in Vim" /></a></p>

<hr />

<!-- section -->

<h2 id="footnote">Footnote</h2>

<p>This is my first blog post using <a href="https://jekyllrb.com/">Jekyll</a>. Writing it, I
have learned quite a bit, which I will write about in another post soon.</p>]]></content><author><name></name></author><category term="vim" /><category term="config" /><summary type="html"><![CDATA[Long, long ago, in a hostel room far, far away, I once read about using Vim as the pager for man. It involved using some script which made vim behave like less (or something like that). I’d stumbled upon it while trying to make reading manpages more comfortable, with syntax colouring, navigation, etc.]]></summary></entry></feed>