 Murukesh Mohanan
Yet another Jekyll post
I shifted my personal site to Jekyll some time ago, but I hadn’t yet fully embraced it. Now that I’d decided to blog again, I set about using Jekyll to see if it could provide support for the blogger Hyde in me. (Yes, yes, that was terrible.)
I needed to set it up so that the site would work across the three ways it can be accessed:
Github Pages, while decidedly convenient for starting out, is not so convenient when it comes to expanding. Not that Jekyll is all that convenient either.
- You cannot easily publish your blog posts under a subdirectory
- Posts cannot have a counter-based ID. The permalink can only be based on the date and title.
- You have to rely on external providers for comment support. Maybe Disqus, or Facebook, or something else.
But…
- Markdown is fun to write in. It is clear, logical and the source is easy to read.
- Jekyll seems to do a good job of templating, without too much boilerplate.
- Having things like code highlighting taken care of is quite convenient.
Setting up Jekyll is quite easy - the site has good instructions. I’ll just focus on things I had trouble doing.
Page permalinks
On Github, pages could be accessed both with and without an extension (/index
and /index.html both worked fine). Naturally, I stuck to the extension-less
form. Running Jekyll locally, I ran into trouble - it did not support
extension-less access. I’d guess this is presumably because the Github Pages
setup has something like this (in terms of nginx config):
try_files $uri $uri.html ...;
Annoyed, I resorted to specifying the permalinks manually. After all, I did only
have four pages - the rest generated as posts. And index.md didn’t need any
help, so the mess is down to three pages.
Code Highlighting
Displaying code proved to be a tricky thing. I’m software guy, naturally my post will include bits of code here and there. I want it to be pretty (syntax highlighting, line numbers, the works). Jekyll offers two ways for prettifying code: Pygments and Rouge. Pygments is written in Python, and Rouge in Ruby. So, naturally, you might think Rouge is the way to go, since the whole damned thing will be in Ruby. Nope.
The thing is, sticking to what Github Pages offers really does constrain you. And Pages doesn’t support Rouge. So, Pygments is the way to go, and is the default.
The first time I tried it out, the result was some consternation. You see, back
when I first made this site for the CS699 course, I’d set display: block for
span tags. And Pygments relies heavily on span tags with CSS classes for
Highlighting. So, where I’d hoped to see something like:
I got (without the colours):
Flabbergasted, I decided to try out Rouge, and it seemed to work fine, except I
had barely any highlighting - the output was marked up, but I didn’t have
corresponding CSS. The docs suggested picking up a sample syntax.css which is
purportedly close to Github’s own style. Ah… But I wanted a dark theme, and I
wasn’t too fond of Github’s theme as it is. After a bit of going around in
circles, I realised Rouge wasn’t supported by Github, and so I went back to
Pygments. A quick inspection showed me what the problem was, and just as quickly
I deleted the offending CSS rule. I had no idea why it was around, since I used
barely any span blocks - at least, I couldn’t see any visible effect on the
site! With that problem solved, two remained: the colour theme conundrum, and
line numbers.
Like with Rouge, the next problem was CSS. Thankfully, the step to get a CSS file for Pygments was easy:
pygmentize -S <theme> -f html > foo.css
After a few trials, I chose the normal theme.
Line numbering was harder. Oh, both could do numbering, but the numbers would be
selected too when you selected the code, and worse, copied. Apparently, Pygments
supported a table option to linenos, but it looked weird. There was a
delightful solution that involved using lineanchors
instead of linenos, and then applying a CSS counter to create the numbers.
Unfortunately, lineanchors doesn’t work when Jekyll runs in safe mode, which
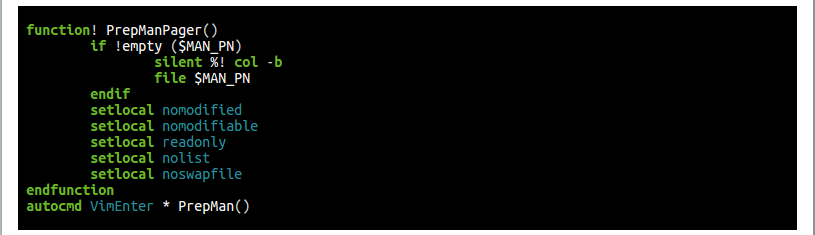
it does on Github. Then I applied the same technique to linenos, and hid the
numbers generated by Pygments ![]() :
:
1
2
3
4
5
6
7
8
9
10
11
12
13
14
15
16
17
18
19
20
21
22
23
24

pre {
    counter-reset: line-numbering;
}

pre span.lineno::after {
	content: counter(line-numbering, decimal-leading-zero);
	counter-increment: line-numbering;
	opacity: 0.4;
	-webkit-touch-callout: none;
	-webkit-user-select: none;
	-khtml-user-select: none;
	-moz-user-select: none;
	-ms-user-select: none;
	user-select: none;
	visibility: visible;
	margin-left: -1em;
}

pre span.lineno {
	visibility: collapse;
	text-align: right;
	display: inline-block;
	min-width: 1em;
}
Sectioning
By default, the entire post content is stuffed into the content Liquid
variable. If you want to split your post into sections, tough luck. This
StackOverflow post helped me out.
One of the answers talks about the post.excerpt feature, where you can use an
excerpt_separator to demarcate out the post blurb, in case you want something
different from the default. Turns out, the idea can be easily extended to a
generic separator. For example, add to your _content.yaml:
section_separator: "<!-- section -->"
And create a new layout (say _layouts/sectioned_posts.html) containing (aside
from the boilerplate):
1
2
3
4
5
6

{% assign sections = content | split: site.section_separator %}
{% for section in sections %}
<section>
{{ section }}
</section>
{% endfor %}
Your source will look like:
1
2
3
4
5
6
7
8
9
10
11
12

Call me Muru.

<!-- section -->

I am an aspiring BOFH. Often called a psycho. Now in my third year of the Master
of Technology in Computer Science and Engineering course in IIT Bombay, and
working for the department as an RA in System Administration, I get plenty of
opportunity to hone my skills. :)

<!-- section -->

I share the hobby of the masses - reading. :P
See my front page for the output. :)
Comments
The last thorny issue was comments. I wanted to enable comments, even if the site had tumbleweeds rolling around. Given the static nature of the site, storing comments here was out of the question. That left me with external providers.
I tried Google+ comments, but text area never loaded properly. Using Github issues seems to be a nice idea, but I’m too lazy to follow through on it. I tried Facebook comments but an odd issue popped up: when I clicked on the text box on my phone, the orientation was forced to landscape, even though the device hadn’t rotated. So, I ditched it and went to Disqus. After styling it nicely, I opened my phone to test … and ran into the same problem. Soon after posting on the Disqus forums, I found the problem: Android silliness. The soft keyboard eats in to the page display area, thus changing the height and hence the orientation.
I wanted to consider both the height and width, so the accepted answer (using
max-width) was not acceptable to me. The next-best solution used boundary
values for aspect-ratio different from 1/1. After some more digging around,
I decided to use device-aspect-ratio instead.